Quantcast
Channel: Swing Archives | StrongFirst
Viewing all 80 articles
Browse latest View live

The “Best” Hip Hinge Exercise

$
0
0

By Pavel Tsatsouline, Chairman

Two weeks ago Steve Belanger started a thread on the StrongFirst forum asking the readers to pick their favorite barbell, bodyweight, and kettlebell exercises. For all the limitations and contentiousness of “top lists,” writing them is a useful exercise. Given your goals, training and injury history, equipment availability, etc., my list may not exactly suit your needs, but hopefully it will make you think and write your own.

Rather than pick an arbitrary number of exercises from each modality, I will select the “best” in each of the following categories: hip hinge, squat, press, and upper body pull. (No, there will be no division into “vertical” and “horizontal” pushes and pulls; life is too short for that.)

I will use the following criteria.

First, the exercise has to have a high carryover to a great number of applications. As I explained in Easy Strength, the Russian term “general strength” refers to the strength “to perform any physical work more or less successfully.” (Ozolin)

Second, the exercise must have an impressive safety record.

Third, the exercise must have a steep learning curve. If 70% of his fighters do not get it, Steve Baccari discards the exercise, no matter how effective it is.

There will be some additional considerations as well.

The hip hinge goes first. The contenders are:

  • Barbell deadlift
  • Barbell good morning
  • Barbell clean (power, hang, muscle, etc.)
  • Barbell snatch (power, hang, muscle, etc.)
  • Kettlebell snatch
  • Kettlebell swing

The deadlift rules. I stated that on many occasions and I will not repeat myself.

There is not enough data about an exclusive use of the good morning, apart from Bruce Randall’s experiment. A knee injury prevented this former Mr. Universe from squatting, so he poured his heart into the good morning. He worked up to a 685 single, his back parallel to the ground. When he tested himself in the squat, not surprisingly, he easily squatted as much. Randall then tested his deadlift and stood up with 770—back in the 1950s, with no drugs, and no previous deadlift practice.

Kettlebell snatches, while documented to have a high carryover to a whole lot of unrelated events like the powerlifts and middle distance running, will not win this fight because they demand rare in this day and age shoulder mobility and stability and because they require considerable skill. Barbell cleans and snatches fall into the same category.

The kettlebell swing is a different story. By now there is plenty of scientific and empirical evidence that the swing has an extraordinary list of “what the hell?” effects. It transfers to max deadlifts (even at the world class level), jumps, and so on, and so forth. In addition, it delivers impressive conditioning. And it is safer and easier to learn than the barbell deadlift. “The kettlebell swing is the true power to the people!” assures Rif.

As much as I am partial to the deadlift, the swing wins the hip hinge class.

Recall that both slow and static strength are needed for complete strength development.  Will we be leaving something on the table without a “grind”? — Not if we pick the right squat to complement the hinge…


Pavel and Peter Lakatos teaching kettlebell swings to the Hungarian federal counter-terrorist team.
Photo courtesy TEK


Kettlebells and Deadlifts Go Together Like Vodka and Pickles

$
0
0

By Pavel Tsatsouline, Chairman

Speaks 1,000-pound deadlifter Andy Bolton: “The [Kettlebell] Swing is a great developer of the posterior chain and will teach you how to develop some awesome SNAP in your hips.  For lifters, this makes them a useful assistance movement for the squat and deadlift.”

And if you have never deadlifted a barbell but have been seriously swinging and snatching a kettlebell, you are already ahead in the deadlift game.  Kettlebell pulls have “greased” the hip hinge pattern for the deadlift and strengthened your deadlift muscles.

Brandon Hetzler, SFG II, CK-FMS, has measured the forces generated in the kettlebell swing. In this set of swings with a 53-pound kettlebell the force exceeded 500 pounds.

There are a great many DL styles.  A hip-dominant style such as Andy Bolton’s, rather than quad-dominant style, suits a girevik’s strength.  Learn it from an experienced powerlifter.

Dan Wohleber’s and John Inzer’s styles heavily rely on the hip hinge and are perfect for a girevik.
Photos courtesy Powerlifting USA

Once your technique is passable, it is time to drill it with high frequency practice.  Here is your plan based on an old Westside Barbell DL template.  Use the max estimated by your powerlifting coach (you have no business maxing at this point).

Workout 1: 65% x 1/15 (reps/sets)

Workout 2: 70% x 1/15

Workout 3: 75% x 1/12

Workout 4: 80% x 1/8

Workout 5: 85% x 1/6

Workout 6: Add 10 pounds and start over

Do the above practice/workout three times a week.  Rest for 30-40sec rest between sets.  Stay on the program as long as you are not struggling.  When the poundage in workout five takes 90% of your effort, take 3-4 days off and work up to what Master SFG Dan John calls a “sort of max.”  For example, 50% x 5, 60% x 4, 70% x 3, 80% x 2, 90% x 1, 105% x 1, etc.  Set a PR but keep perfect form and save something for another day.  The deadlift severely punishes those who overextend themselves—and rewards those who treat it as a practice, not a challenge.  Consider the contrast between these two statements by two strength authorities.  Louie Simmons pointed out that heavy deadlifts take a lot more out of you than they give you.  And Dan John observed that building strength with light “grease the groove” type deads is like “stealing.”  Save the killer attitude for competition—when you are ready for it.  Meanwhile, practice.

Start every DL practice with 3 sets of 3 prying light goblet squats and 3 sets of 10 hard style two-handed swings with 30% of your bodyweight (sweet spot for power production, according to research by Brandon Hetzler, SFG II, CK-FMS).

After your deads alternate kettlebell pulls and squats from workout to workout.

For your kettlebell pulls you have multiple choices: swings (one-arm, two-arm, hand-to-hand), dead swings, double swings, double cleans, snatches.  Favor heavier weights and keep the volume in the 100-150 rep range.

On the squat day do goblet squats or double kettlebell front squats. Dan John recommends a squat volume of 15-25 reps.

You are on your own with your upper body work.

Once you have run through this cycle and “sort of maxed,” drop us a line on the StrongFirst forum and we will guide you to the next step.

Double power to you—deadlift and kettlebell!

# # #


Change Beckoned; Strength Answered.

$
0
0

By Laura Nepodal, SFG

I think I knew I wanted to be strong when I threw a boy for distance for the first time.

It was June of 1997, in a little basement of a little farmhouse in a little farming town, out in the middle of the sprawling fields of Iowa. A handful of ten-year-old boys—plus one girl and her little brother—had infiltrated the sweltering subterranean space to secretly watch the Holyfield vs. Tyson fight. It was to be a battle of immense proportions—who would possibly want to miss that? Yet there was time to kill—inferior mortals were in the ring, delaying the battle between the lords of the boxing world.

And what do ten-year-old boys (and one girl) tend to do when left restless, unsupervised, and with access to glorified violence?—They wage their own epic battle, of course.

Amidst the tussling and screeching that filled the basement, one shrill squeal rang out from the aforementioned little brother as he was helplessly pinned by one of the older boys. So ten-year-old me walked over, picked the boy up off of my little brother, and tossed the said boy across the room. The boy turned to look at me, wide-eyed, and said, “WOW. I was just picked up and thrown by a GIRL!”

You bet your booty you were, buddy.

While we all left with our ears intact that day, I think I left with something equally as valuable: an appreciation of being able to handle myself. An appreciation for being strong. (Although I may have been equally inspired upon hearing my Israeli cousin’s profound statement, “Be strong like cow.”)

Like all things that are worth understanding and integrating into our lives, strength is a multifaceted concept. There is the nearly unfathomable strength that we witness in extraordinary situations—the bravery of a five year-old girl fighting for her life against acute leukemia, and is able to thank God for being her healer as she lies on a table receiving full-body radiation (my sister fought and won that battle, and continues to be one of my very greatest inspirations). More often, we witness strength in its more subtle forms daily—in the quiet displays of willpower and accountability that we consciously instill in our everyday choices when no one is watching.

And, more notably, I feel, is our ability to push past our own inertia. Inertia is grounding, safe, known. To breach that barrier and push past our comforts, to begin the process of surpassing our own expectations of ourselves, is the most difficult step. But you start to find that it was the first step that was the hardest. The potential of —or rather, the fear of— failure, is no longer so insurmountable. You have the momentum of your bravery, of your strength, to carry you forth. And when you hit that inevitable bump on your path that could slow you down, the foundation of strength that you’ve nurtured will help you to maneuver that obstacle – or, you know, totally crush it into oblivion because you’re just THAT strong.

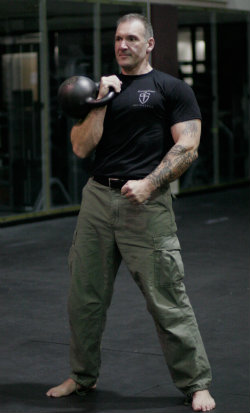
Women, enter the most honest and least prejudiced judge of strength you’ll ever meet—iron. Iron will never lie to you, never coddle you. You will love it, spend a great deal of time with it, and occasionally become angry or frustrated with it. But it will not waver, and it will always hold you accountable. When you clean a kettlebell to the rack position with the intention to press it, or set up to deadlift a loaded barbell off the ground, the iron expects you to push past its inertia. It expects you to be strong. It demands it.

In a society that doesn’t have a history of lauding the physical strength and prowess of women, our collective inertia is substantial. We are told from a young age that girls can’t do push-ups/pull-ups, that full-contact physical activities weren’t meant for us, and that we are generally weaker in relation to men. Standards are set lower for us, and so collectively, our general inclination is to aim low, or to maybe reach that silly, low-slung standard.
Because to go beyond that would be to push through our own inertia, and that’s just freakin’ hard. It takes internal reformation of the way we perceive ourselves; a complete restructuring of the way we view strength in relation to ourselves as individuals; and a strong sense of self in a society that doesn’t tend to celebrate us when we achieve something iron-STRONG.

In other words, it takes a lot of the strength mentioned earlier, a lot of mental toughness (see Master SFG Instructor Mark Reifkind’s impressive blog on this topic, applicable to all), a passion for self-betterment—and maybe a little desire to squish those silly, predetermined limits that we women have allowed ourselves to be yoked into. It is also immensely helpful to have a community of like-minded brothers and sisters in iron to learn from, inspire you, and help you along the way. StrongFirst is that for me, as well as for a plethora of incredibly gifted, talented individuals.

When a woman takes her first conscious step towards being physically capable and more–past her inertia—she immediately expands her limits of possibilities—because really, if you’re going to contradict what society (and yourself, up ’til now) have told you that you’re capable of, what other awesome stuff can you accomplish? Not to mention that being strong will make many other pursuits of the physical variety significantly easier and more enjoyable. Train hard to play hard.

You may not start strong: you may not be able to do that full push-up yet (death to the so-called “girl push-ups”, I hereby decree the demise of that belittling name!), complete a bodyweight pull-up, press a 12kg kettlebell, or deadlift your bodyweight—but oh, barring extraneous, isolated scenarios involving medical maladies, if you put in the time and effort, hone your focus, and apply the StrongFirst concepts to your training, you CAN get there.

As one of my favorite authors, Paulo Coelho, profoundly stated, “In order for us to liberate the energy of our strength, our weakness must first have a chance to reveal itself.” You can only be strong if you know where your weakness lies—so acknowledge your weakness, thank it for showing you the way to the new, improved you, and then surpass it. Do not simply seek to meet the standard set before you; strive to crush it. If only for the thrill of the chase and the inevitable self-betterment, self-empowerment, and all-around increase in physical health and holistic well-being, do not aim for less for yourself! You will look good, feel great, and be strong as hell.

The only thing stopping you from pursuing and achieving this is fear, laziness, or apathy—none of which, in my most humble opinion, should be acceptable qualities that you nurture in yourself.

At StrongFirst, we know what women are capable of. The bar is not set low for men, and it certainly isn’t for women, either. Once you have made the commitment to embrace and pursue your strength, what is the standard you should strive to reach, or for the exceptionally strong or ambitious, to surpass? What makes a woman “strong”?

A strong woman might be able to successfully complete some, if not all, of the following:

  • Three bodyweight pull-ups
  • 1/3 bodyweight military press
  • 1.75 bodyweight barbell deadlift
  • 1/2 bodyweight get-up
  • 1/2 bodyweight swings for reps

Why strive to be strong as hell? Because being physically strong is incredibly liberating, very healthy, and immensely empowering. When you train smart and train strong, you add longevity to your quality of life, make every other physical task easier, and gain an intense, burning curiosity to discover what you’re capable of. At first, you may look at a weight you deem too heavy and shy away from it. Once you have whetted your appetite
with the taste of success, you will begin to look at that same weight and think to yourself, “I bet I can do that…”. When this happens, and you have attained a strong understanding and mastery over the skills and techniques of strength and safe training that SF teaches, you are well on your way to becoming strong. Nurture that ambitious curiosity. It will also will transfer to other parts of your life.

To some, the above numbers may seem unreasonable or too excessive. I feel they’re an honest representation of what women are capable of, knowing there are many very strong women out there that can surpass these numbers.

Yes, minus the extraneous mutants that are out there, getting strong is hard. It takes intense commitment, time, focus, and a hunger to learn. Many women having a misguided understanding of what training heavy does to the female body (we only have so much testosterone at our disposal, ladies; a huge, Schwarzenegger-type physique is not an option for us without supplemental assistance), and a skewed perspective of what a high-volume, low weight protocol can do for their physique (there is no such thing as a “toned” muscle, or a “long” muscle; your muscles are the length they are based on the skeleton they’re attached to, and a low body fat percentage will give you that sought-after sculpted look, which lifting heavy effectively helps with). Educating ourselves, and nurturing the necessary fortitude it takes to be strong, are the first steps. There are many women out there that have yet to embrace and forge their own strength for fear of failure. Ladies, we must all start somewhere.

So let’s start somewhere.

Firstly, I would very strongly recommend that you seek out a certified StrongFirst instructor to assist you with your technique, and to help enforce the principles of strength that we effectively utilize. There is no substitute for good coaching done face-to-face. If that is not an option for you, that’s okay—the StrongFirst forum is a great way to get some feedback on your training.

Ideally, you will have access to kettlebells and a pull-up bar. If you are a bit more advanced in your training, access to a barbell would be ideal, as well. Pull-up practice, swings, get ups and military presses are a good place to begin, with the addition of barbell deadlifts for those who are a bit more advanced.

Pull-up Practice

If you have a difficult time completing a pull-up, do the following: Install a pull-up bar in the doorway to your living room, bedroom, or another frequented room (mine is in the kitchen). Whenever you walk into that room, jump up to the pull-up bar so that either your neck or chest are touching the bar, and then slowly lower yourself through the negative portion of the rep. Just one rep is enough, as you will be walking into this room more than once a day.

If you are unable to perform this without assistance, have someone push your mid-back with just enough pressure to help you to the top. If you don’t have a training partner, you might find the use of a stretch-band to be helpful. If you do use stretch-bands, be sure to place a foot in and stand on the band, versus kneeling in it; I feel the kneeling position tends to promote lumbar extension, making the ideal hollow position impossible to
achieve. Though stretch-bands have a tendency to offer assistance in the part of the pull-up that isn’t most people’s sticking point, it does enable you to get to the top of the pull-up and work this position. Within a few weeks, you will notice that this is much easier than it was when you started.
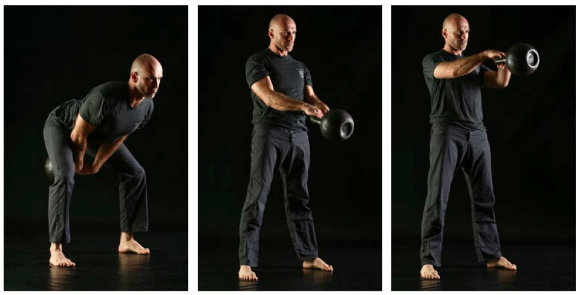
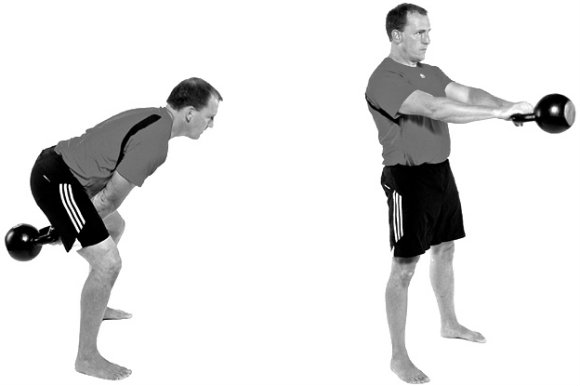
Swing

The kettlebell swing is an excellent option for conditioning, as well as for all-around strength. If you are just starting out, depending on your athletic background you may want to use an 8kg or 12kg kettlebell. Eventually, these weights will feel too light for you. At first, keep the reps low—you want each repetition to be explosive, powerful, strong. When you feel your form start to slip, stop. Perform sets of no more than twenty swings; if that feels too easy, then up the weight, if you can do so and maintain proper form. Doing powerful swings, and eventually heavier ones, will condition you, strengthen your grip and abdominals, and give you a strong, shapely posterior. Eventually, doing heavy swings alone will make your barbell deadlift much stronger (my own barbell deadlift 1RM increased by 30 pounds after a three-month hiatus from deadlifts by swinging nothing lighter than a 32kg during my workouts). So remove thyself from the disgrace of frequenting the hamster wheel, and swing a badass ‘bell instead.

Turkish Get-Up

The get-up is a strong way to work the shoulder stabilizers, and effectively targets many muscles groups in one movement. The get up should be performed with no weight at all until proficiency of the movement is achieved, and should be done with careful intention, without the utilization of momentum—this is a grinding movement, requiring strength and focus. Perform 3 sets of 3 repetitions, right and left, with no weight at all to start, or a weight that is moderately difficult when your skill level has deemed the use of a weight to be safe.
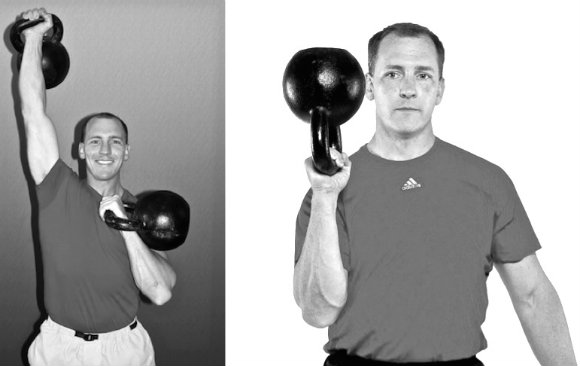
Military Press

Military presses are a good counterbalance to your pulling practice—and the practice of both will make the other skill stronger. Use a weight that you can press 3-5 times without turning the movement into a push-press, and perform 2-3 sets in a workout. When you get bitten by the strength bug, you will want to up your weight; as Pavel has been known to say, “To press a lot, you must press a lot”. So press frequently, using a weight that is
moderately difficult.

Barbell Deadlift

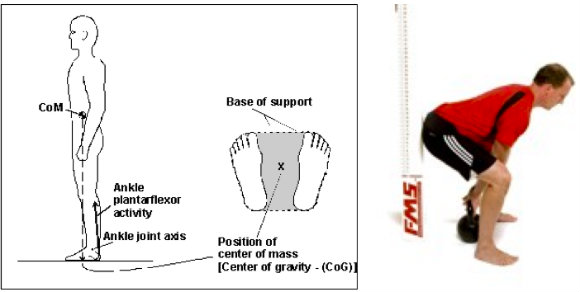
If you are a bit more advanced and have access to a barbell, I highly recommend doing deadlifts. Pavel has outlined numerous times the benefits of the deadlift for strength gains, its ability to transfer to many other lifts and everyday activities, and its ability to target so many muscle groups at once. Plus, there’s nothing quite so satisfying as lifting a lot of iron off the ground. Be sure to keep the weight light until you are able to complete the movement correctly—without using your low back, keeping your abdominals and lats connected and engaged, and pulling from the hips. (Many find it useful to envision pushing the feet down into the ground, as though you’re attempting to push the earth way from you.) With the deadlift, as with other grinds, you don’t want to do too many repetitions in a workout. So keep the reps low, and the weight at least moderately challenging, to achieve the greatest benefits of the lift.

This is just the tip of the proverbial iceberg, my sisters. We all start somewhere, and I believe this is a good place to start. But of course, this isn’t actually where you start—that first step is yours to take. Before you can press, pull, or manipulate iron past its own inertia, you must conquer your own. It is just the start of an invigorating, glorious, epic journey, that first step. And that’s what strength is—a journey. So surround yourself with those who are stronger, more educated, more advanced, and listen. There is no excuse not to start now, no reason to fear your strength.  Embrace it: the time has come to liberate the energy of your strength.

# # #

Laura Nepodal, SFG is an avid rock climber, deadlifter, and student of strength.  She is also an academic student pursuing her degree in Kinesiology, with the intent of attaining a doctorate in Physical Therapy.  You may reach her by email at lauramnep@gmail.com, or visit her website at www.classicironkettlebells.com.

Kettlebells + Deadlifts, Part II

$
0
0

By Pavel Tsatsouline, Chairman

Several months ago I wrote how a girevik should go about converting the posterior chain strength he or she has built with swings and snatches into a respectable barbell deadlift: Kettlebells and Deadlifts Go Together Like Vodka and Pickles.

Patrick Whitaker wrote on the StrongFirst forum: “I started the program with a max deadlift of 330 lbs.  I tested my “sort of max” today at 375 lbs.  The article says to come here and post my results and find out what to do next.  So, what’s next?”

Well done, Patrick.  Next is a powerlifting style cycle.  Pull three times a week, alternating barbell deadlift and kettlebell swing/snatch workouts:

Monday: Deadlift
Wednesday: Swing and/or Snatch
Friday: Deadlift

Monday: Swing and/or Snatch
Wednesday: Deadlift
Friday: Swing and/or Snatch

On your kettlebell days do 100-200 total reps.  Favor heavy weights, lift them explosively, and do not rush the clock.  Right now your priority is power, rather than conditioning.

Here is your deadlift cycle:

1. 295×5/3 (reps/sets)
2. 305×5/2
3. 315×5
4. 325×5
5. 335×3/2
6. 345×3
7. 355×3
8. 365×2
9. 375×2
10. New “sort of max”

In seven weeks you will very likely be pulling 405×1.  Four wheels are more than most guys at the gym can do.  Real adult weights are just around the corner.

To put together a power cycle such as the one above, work back from the heavy double you plan to pull in 8-12 workouts.  A conservative goal is to double your today’s single.

Go back in 10-pound increments.  The last two workouts are doubles.  The first four or five are fives.  Plus three to four sessions of triples in the middle.

Start with 2-3 sets of 5 and taper down to 1 set.  Start with two triples.  One double is enough.

Here is another sample cycle, this one for a recent “sort of max” of 305:

1. 205×5/3
2. 215×5/2
3. 225×5/2
4. 235×5
5. 245×5
6. 255×3/2
7. 265×3/2
8. 275×3
9. 285×3
10. 295×2
11. 305×2
12. New “sort of max”

Ladies, if your max is below 200, jump 5 pounds a workout.  Here is a sample cycle for a recent “sort of max” of 185:

1. 145×5/3
2. 150×5/2
3. 155×5
4. 160×5
5. 165×3/2
6. 170×3
7. 175×3
8. 180×2
9. 185×2
10.  ”Sort of max”

Learn the intricacies of barbell programming, along with the professional technique in the squat, bench press, deadlift, and military press, at a StrongFirst Lifter cert (SFL).  I am teaching another SFL cert with Dr. Michael Hartle, Master SFG, American Record Holder in the Bench Press, and Head Coach Powerlifting Team USA this July:

Tuscon, AZ, July 12-14

Power to you!


Gray Cook on Simple & Sinister

$
0
0

Simple and Sinister, Pavel Tsatsouline’s new book, is eloquent in its simplicity. People try to overcomplicate a position by adding more where it’s unnecessary, but the true artist sculpts, whittles and pares things down to leave something that’s absolutely beautiful—not by adding more but by taking away.

Kettlebell Simple & Sinister by PavelTo those of us experienced in kettlebells—if we have a background with Pavel or a background in strength training—in Simple and Sinister he’s telling us things we know, but need to hear again.

(If you’d prefer to listen instead of read, 
here’s a longer audio version of this article, 
Episode 40 of Gray Cook Radio
 http://graycook.com/?p=625)

And if this is your first introduction to kettlebells, I can’t think of a better starting point than Pavel revisiting some of his most profound philosophical statements about strength training.

Yet here he goes one step further: He writes the entire program for us, and he does an excellent job of building a case for his exercise choices.

Mark Cheng, Senior SFG - Getup

He discusses the beauty and simplicity of the Turkish getup, and shows that done right, it’s the slow, posturally correct, proprioceptively rich checking of left and right symmetry in multiple movement patterns and multiple positions—a sort of triplanar functional exercise.

The swing is an exercise that’s often bypassed in kettlebell work. People quickly move to snatches and cleans, bent presses and other complicated lifts, and don’t realize the engine that drives Pavel, Brett Jones, Mark Toomey, Dan John and the folks working with StrongFirst is that they never get away from the foundation.

That simplicity is what we need from our modern palate of exercise. We don’t need more variations and more options. We need a simple linear progression to get us to an exercise that has more benefits at minimal risk.

What Pavel has done is given us a program minimum, and that’s the same philosophical standpoint I’ve gotten to with the Functional Movement Screen. I don’t care how good you are, but please don’t leave a dysfunction or a deficiency. That’s what Pavel is doing, too: This is your minimum.

We know life is going to throw you less training time. Your occupation will add stress. The commitments we have in life outside of our personal fitness will often cause us to pare down our chosen exercise program.

Unfortunately, often turn to a specialty. Runners don’t have time to stretch and lift, but they have time to run. Lifters do the lifts that give them positive feedback and probably avoid those that are their weakest links.

What Pavel says is, ‘I’m going to give you a couple of exercises done a certain way. When in doubt, do that. Get better at it. There are some variations. There are some progressions you can do, but be satisfied with the amazing results.’

That couldn’t be more perfectly stated.

When I lecture to young exercise professionals, they want more variety. They want more options, more variations of exercises.

Gray CookAre you sure? Are you asking me for more deadlift variations? Doing more variations of a deadlift isn’t going to make you a better swinger. It’s just going to give you more functionality in the deadlift.

Yet we love to progress your deadlift into a swing. The deadlift is a beautiful foundation, but for fat loss, metabolic power generation and athletic movements, it’s the swing that’s going to bring everything to the surface. The swing will mutually benefit one person who wants to get stronger and one who wants to have more speed and power.

I have just too many good things to say about Pavel’s new book. I downloaded it as an audio book, and have listened to it twice. Now I’m going to go back and thumb through the pages because I want to see his photographs and explanations.

The Naked Warrior by Pavel

It’s a work I’m going to lay right next to his previous work, The Naked Warrior. Pavel creates a constrictive program, and I’d like to elaborate on that. He’s giving us two contrasting and complementary exercises. These are going to present difficulty. You can control some of that by how much weight you use, but at no time do you have the option of using poor technique.

Pavel has a certain way he likes to train his explosive movements, which he calls hard style. It’s the safest and most well-thought-out way to deal with power moves and moving weight. The steps he gives to build a swing and to build a getup are constrictive. They’re going to run you right up against your problems.

He’s doing that because he can’t be in the room with you. The best coaches in the world can design a program not with restrictions, but with constrictions. These constrictions force you to have better form, force you to do the right amount of work at the right time, and force you to rest on a certain day and work harder on another day.

Constrictions are one of the reasons I designed the Functional Movement Screen, so we’re not putting a bad pattern under load. What Pavel has done is given us a beautiful way to get under load and at the same time to enhance movement quality, precision and progression at all costs.

If you’re already a fan of kettlebells, if you’re a fan of strength culture, in Simple and Sinister you will hear what you’ve heard before… in a refreshing, new and simplified way to reassure you that you’re already on the right path.

If you’re new to kettlebells, there isn’t a better starting point than Pavel’s. Unbelievably simple, yet the workouts and work that can be derived from this is absolutely sinister. It’s a concise read, with so many pearls. I’m on my second pass through and I will definitely do a third.

When an author, a coach, a philosopher or somebody who’s immersed themselves in physical culture like Pavel has with his presentation of the StrongFirst community and some of the previous work he’s done, takes the time to simplify his knowledge into clear, concise statements, you better put that on your shelf.

Don’t just read it and then run out to sell this information to your clients, because you’re just renting it. Do what he’s telling us. Embrace it. Just pick up the kettlebell, follow the rules and let it teach you. I can’t think of a better Christmas gift for some of my closest friends and the people in my family who like to train than for me to pick up a copy of this and get it over to them.

I would encourage you to do this read. It requires a lot of work to take something that produces significant results and turn its application into something so simple.

Well done, brother!

Gray Cook

Everything IS a Nail

$
0
0

By Pavel Tsatsouline, Chairman

At a recent SFG kettlebell cert Dan John and I were waxing poetic about the sheer perfection of a program of swings, goblet squats, and get-ups for anyone, from the proverbial “Edna” on Social Security to “GI Joe,” an Army Ranger barely old enough to buy a beer and brimming with testosterone.  One of the students respectfully asked: “Could it be that if the only tool is a hammer, every problem looks like a nail?”

Our answer was: every trainee IS a “nail.”  Some are sturdier than others, but all undoubtedly are in the “nail” family.  All members of our species share the same anatomy and physiology.  What works for one, will work for another.  The difference is in the degree: how hard you pound the “nail” and how heavy of a “hammer” you are going to select.

Edna and Joe may have different “sport-specific” goals.  She wants to be able to pick up her grandkid and to get up from the floor with no help and no groaning, should she decide to get down there to play with that grandkid.  She aspires to stand up from a chair spritely, to walk strongly, without fearing of falling and breaking her hip.

Joe’s goal is to be able to sprint with his 100-pound kit, quickly move in and out of different shooting positions, negotiate obstacles without blowing out an ankle or a hamstring, carry a wounded brother-in-arms.

Different as they appear, Edna’s and Joe’s goals rely on the same elements: mobile hips and knees, powerful legs, a stable trunk, a well “knit” body that moves as a unit, rather than a “collection of body parts.”  Once these general demands are met, specific skill practice may be needed—the Ranger needs to be taught how to correctly pick up a wounded comrade—but that becomes a piece of cake once the fundamental movement patterns are there, along with mobility and general strength.

There are many ways to develop these fundamental qualities.  For instance, one could take up yoga to get flexible (in spite of a decided lack of squat type poses), get strong with the powerlifts, and go to a physical therapist to attempt (in vain, unless his name is Gray Cook) to make everything fire the right way.  Edna might get her arm twisted into yoga, but Joe would just as likely take up interior decorating.  In turn, Edna would rather join a gun range than a powerlifting gym.  Joe would not mind.  Fortunately, many US military bases in most unfriendly places are equipped with barbells.  Unfortunately, the stress of nightly missions in Afghan mountains does not leave much adrenaline for heavy squats.  And when he tried it, Joe almost let his team down as he was hobbling at half speed with sore quads on a night raid.  It would not occur to either Edna or Joe to seek out the services of a physical therapist or some “movement coach.”

There are other ways, but most of them are just as cumbersome and unrealistic.  Enter the kettlebell.  Edna can easily afford one or two and Joe has them in his deployment kit.

The Swing, the Get-Up, and the Goblet Squat are the three most beneficial exercises anyone could do—period.  Some might need to add other moves, but they must be planted on the foundation of these three whales.

The Swing fills the hips with power and the back with vigor.  The Get-Up makes the shoulders resilient and the abs bulletproof.  The Goblet Squat unlocks the hips and puts a spring into one’s step.  Muscles appear in all the right places while the fat beats retreat.

When done correctly, these exercises are exceptionally safe.  They are beyond safe—they are “anti fragile,” to borrow a word from Nassim Taleb.  The Program Minimum plus goblet squats is true health training.  I can run out of fingers on both hands listing the various health benefits of swings alone.

“Customization” is just a euphemism for “differentiation” in the business world.  The only “customization” you need is the size of the bell.

You are the nail; I rend you the hammer.

The “hammer”: Pavel’s new book Kettlebell Simple & Sinister

Thumbs Up in Kettlebell Pulls?

$
0
0

By Pavel Tsatsouline, Chairman  

Recently we have seen a number of students coming to SFG certs clean and swing with their thumbs up.  I am here to put an end to this fashion.

Other kettlebell systems have been known to use a variety of fist positions and they often have good reasons in their own context.  For instance, keeping the thumbs up at all times is an efficient way to clean when you are going for 100 reps.  For StrongFirst this grip is unacceptable.  We are after power, not reps.  And when you attempt to move kettlebells fast with the hammer grip, you are risking injuring your elbows on the bottom of the backswing.  You could literally arm-bar yourself.

At SFG we teach starting the clean with the thumb pointing slightly down, about 7 to 8 o’clock for the right arm.  For doubles we are looking at a very open “V”.  A “V” opens up more space between your legs when you clean heavy doubles.

A “barbell” grip, with the handles in line and the palms facing straight down, is totally acceptable for a beginning girevik.  Once you get stronger though, you might find it difficult to pass a pair of heavy kettlebells between your legs.

You may have seen Geoff Neupert, Master SFG employ yet another grip: keeping the thumbs turned up to 10 and 2 o’clock.  Like the classic “V”, an inverted “V” gives large kettlebells more space to pass between the legs.  An additional benefit, points out Geoff, is that this grip prevents some gireviks, especially big-chested ones, from rounding their upper backs and unpacking the shoulders on the bottom of a clean.  The inverted “V” is an individual choice of an advanced practitioner, not an SFG standard.  Because, like with a hammer grip, there is a risk of injuring your biceps.

The proponents of the hammer grip like to argue that it allows them to engage their lats more. You may have noticed the connection between the wrist and the shoulder rotation—the former tends to drive the latter.  This is why the hammer and the inverted “V” make it easier to screw your shoulders into their sockets.  The fist turns and turns the shoulder in turn.

Jon Engum, Master SFG and a high level martial artist, is not impressed: “I can engage my lat in a punch with a horizontal fist just as well as a vertical fist.”  Neurologically you should be able to disassociate the movement of these two joints—turning one does not have to turn the other.  Following is a drill to teach you how.

Stand up and straighten out one arm in front of you, its palm facing down.  Maximally rotate your shoulder (external rotation) and your wrist (supination) until your palm faces up.  Note the tight “screwed in” sensation in the shoulder.

Repeat the above drill—turn your palm up and screw your shoulder into its socket.  Anti-shrug your shoulder with your lat.  Note the tight sensation in your armpit.  Without losing this sensation and without disturbing the shoulder alignment slowly turn your palm down.

Power to your pulls!


heads up!

$
0
0

By Pavel Tsatsouline, Chairman


A few years ago, a strange idea emerged from the clinical world: the insect head.  White coats started telling lifters to lock their heads onto their torsos during hip hinge lifts—deadlifts, swings, cleans, and snatches, barbell and kettlebell.

I urge you not to get bogged down by the science and the pseudo-science of their arguments.  Instead, ask yourself these two questions.
 

1. Is there an epidemic of neck problems from the traditional technique — the head up and the neck in extension — among powerlifters, weightlifters and hard style gireviks?

The answer is: No. 

Sure, some athletes from any sport have neck issues but good luck correlating them to neck extension in hinge lifts.  Some powerlifters have neck problems—mostly from driving the head hard into the bench on the bench press.  Some weightlifters and gireviks tweak their necks—usually by whipping them inappropriately.  But from a simple act of keeping their heads up, the way they have been doing it since they were crawling babies?  I do not think so.

Brett Jones, Master SFG, has pointed out that some folks can have problems when their thoracic extension is limited.  The neck has to compensate to keep the eyes on the horizon and goes into hyperextension.  Indeed.  So what is the answer?—Fixing the lack of mobility with professionally applied corrective exercise.  Medical intervention, if there are medical issues.

The answer is NOT dumbing down the classic technique to accommodate dysfunction.  That would be akin to our government lowering the PT standards for the military and firefighters when fewer recruits are able to pass the existing standards.

Indeed, there may be a particular medical case when the doctor tells the patient that he or she must keep the neck neutral throughout a hip hinge exercise.  If that is your doctor’s order—follow it.  But if this is a prescription for another patient… don’t you understand the risks of taking someone else’s drugs?  Medical Rx for one patient ought to never be confused with the standard operating procedure for healthy people.

Now to the second question:

2. Has the new technique improved the performance of top lifters?

The answer is: For some.  And the technique is far from being new. 

Hugh Cassidy and Franco Columbu used it four decades ago.  A review of championship deadlift techniques reveals a remarkable variety of head positions.  Andy Bolton cracked the mystical 1,000-pound barrier with a neutral neck—he looks at a spot 6-10 feet in front of him at the start of the pull.  Lamar Gant, the first man to pull five times his bodyweight, 661 at 132 pounds of bodyweight, did it with an extremely hyperextended neck.

Moving your body into one position or another is often a trade-off.  Extending the neck helps to activate the posterior chain—while weakening the abs and the quads.  A talented powerlifter, with the help of his coach or just through great body awareness, will eventually figure out the optimal amount of trade-off for himself.  (Only competitive powerlifters should do this.  Recreational lifters and athletes from other sports should follow the Olympic lifting and kettlebell lifting guidelines below.)


Unlike the slow moving deadlift, quick “pulls” (barbell or kettlebell) tolerate no variety in neck alignment.  There is only one way—head up!

If a champion weightlifter cleans 500 pounds, you know he can easily deadlift a couple of hundred pounds more.  That means his quads and abs are not greatly challenged by the first pull (the deadlift part of the clean or snatch).  So robbing Peter (the posterior chain) to pay Paul (the quads and the abs) would be wasteful as Peter is the one doing most of the work in quick pulls.


The same applies to a hard style girevik.  He has no trouble breaking the kettlebell off the platform and his spine is not crushed by enormous loads.  His mission is to accelerate the relatively light kettlebell to 10G and it is the job of his posterior chain.  So he needs to maximally reinforce it, and neck extension does exactly that.  Lift your head up—extend, not hyperextend—on the bottom of your pull and your entire back side will immediately light up, vibrating with stored energy like a bow.


From Supertraining, a fundamental text on strength:

The position of the head has a powerful effect on overall posture…  As it is well known, in gymnastics a dropping of the head forward initiates the forward somersault, just as the backward throwing of the head initiates the back flip in gymnastics and diving…  It is vital to use a definitive extension of the neck to facilitate powerful contraction of the postural muscles of the trunk during all lifting movements from the ground.  This facilitating action of the head should not be done so as to cause a pronounced hollowing of the back…[but] in such a way as to maintain as closely as possible the neutral spinal disposition, with its three natural curvatures…  Correct positioning of the head will ensure that the back assumes the posture where trunk stabilization is shared between the erector muscles and the spinal ligaments…  Action of the eyes is closely related to the action of the head, so it is essential to facilitate correct…posture by using the eyes to guide the head into the position which is most appropriate for each stage of the given movement.  Generally, the neutral spine position is maintained most easily if the eyes are looking almost directly ahead and fixed on a distant object.

We accept the above as the SFG standard.


The only person I have ever seen manage a perfect hard style swing, powerful and graceful, while keeping his neck close to neutral is Master SFG Brett Jones.  He adds some nuances to the standard recommendation and offers an option for some:  “If you are getting yanked into extension during the eccentric catch of the kettlebell, then it is a bad thing.  If the arms are connected to the body and you choose to hold the extension, it can be a very good thing.  When I try to keep my eyes on the wall in front of me I feel like I am jerked into a bit of cervical extension and it doesn’t feel good.  For me it is much better having a focal point closer to me (4-6 feet in front of me).”  Brett adds that he does have a slight cervical extension, even though he is looking at the floor 4-6 feet in front of him.  He observes that most people who think they are neutral are actually in flexion.


The Master SFG also warns against hyperextension.  It is easy to get into if you are doing your swings almost stiff-legged.  If your knees are almost straight on the bottom of the swing, your torso is bound to be almost parallel to the ground.  That means looking straight ahead will automatically hyperextend your neck.  Remember that the hard style swing is related to a jump and as such demands some knee flexion—not to the point of squatting, but enough to activate the glutes.
 

In summary:

  1. The standard recommendation for swings is to keep your eyes on the horizon, which will place your neck into mild extension on the bottom of the swings—provided you have healthy thoracic extension and you are not stiff-legging your swings.  In the gym the “horizon” can be where the wall and the floor meet if you stand far from the wall, an electric outlet, etc.  Note that the “horizon” is lower than your eye level.
  2.  

  3. If your upper back is too immobile to allow you to look straight ahead on the bottom of the swing without hyperextending your neck, see a specialist to correct it before swinging kettlebells.
  4.  

  5. If you have the required mobility, are not stiff-legging your swings and your neck is still not comfortable on the bottom of the swing, first make sure that it is your lats and not your traps and neck that absorb the force of the kettlebell backswing.  If your technique is correct, you are healthy, and your neck is still not comfortable, experiment with a lower focal point on the bottom of the swing—typically 5-10 feet in front of you.
  6.  

  7. Never whip your neck into extension on the bottom and/or into the protracted “chicken” position on the top of the swing (the “bobble head”).


Heads up and power to your swings, ladies and gentlemen!


Kettlebells and Powerlifting: A Match Made in Heaven?

$
0
0

By ‘The King of The Deadlift’ Andy Bolton


Kettlebells are a waste of time!

Or so I thought, until I became friends with Pavel.

Like many Powerlifters, I dismissed kettlebells outright, because…

“How can something that *only* weighs 48kg do anything for me?”

Fortunately, I eventually decided to start experimenting with kettlebells, and the results have been pretty damn good.
 

THE HISTORY

When I deadlifted 1,003lbs, and then followed it up a few years later with a pull of 1,008lbs – I was squatting extremely heavy. Way over 500kg. (Feels like the weight of the Earth on your back in case you’re wondering)  ;]

Squatting these kinds of weights built tremendous strength in my entire back, glutes, quads and hammies. Think that helped my deadlift? Of course it did!

In fact, when I pulled 1,003lbs, I only went up to 770lbs in the gym on my competition-style deadlifts.

Think about that for a second. It’s kinda weird.

However, in 2009 things changed.

I called 520kg on the squat at the WPC world powerlifting championships, but one side got loaded as if I’d called 560kg. (40kg heavier than it should have been).

I went down about halfway with the bar, but I didn’t come back up.  (Unsurprising.)  The spotters had to help me.  I then benched 290kg and pulled 440kg.

The next day, my left knee blew up like a balloon. Long story short — I had to have surgery. After surgery, the desire to squat HUGE weights – 500kg+ — had gone. I figured it too risky. And kind of a waste of time because squat records have been bastardized by slack judging. (Compare ALL the guys who’ve squatted over 1200lbs and you’ll see what I mean.)
 

THE QUESTION, AND THE SOLUTION

So now the question became:

How Do I Deadlift BIG Without Squatting Heavy?

Enter the kettlebell swing. The 2-handed version. The foundational exercise for all other kettlebell lifting.

Pavel introduced me to this exercise several years ago. We both instantly realized that my body mechanics on the swing are virtually IDENTICAL to my deadlift mechanics.

The perfect assistance exercise?

Er, yeah!

The great thing about the deadlift and the swing is that the amount of knee bend is significantly less than on a squat. Neither exercise causes my knee any bother.

Right now I’m swinging the 92kg kettlebell for 10 sets of 10 reps, on the minute, every minute.

This has given me 3 huge benefits:

  • Good work capacity
  • Stronger lower back, glutes and hamstrings
  • Better grip

Needless to say – all good things if you’re chasing a bigger deadlift!

While I haven’t pulled over 1,000lbs for quite a while – I’m getting close again. I recently deadlifted 380kg in the gym for a double. And it was fast. No big deal. To be honest – 400kg for a double felt like it was there. I’ve never touched those weights in the gym before.

Things are once again looking good for the 1,000lbs-plus deadlift!
 

SIMPLE PROGRAMS FOR THE BEST RESULTS

I know there are many excellent exercises you can do with a kettlebell, But I have stuck to the 2-hand swing. As an assistance exercise for the deadlift it is AMAZING.

And here’s the thing to remember: You can get VERY GOOD at a small number of things if you practice them regularly and stick to a proven plan. Or, you can do many things and become a ‘Jack of All Trades and a Master of none’

I prefer the first option.
 

MY KETTLEBELL SWING PROGRAM

    • Start with 48kg for 5 sets of 10 reps.
    • Increase work capacity until I was fit enough to do them ‘on the minute every minute’
    • Add a set whenever I could until I was up to 10 sets of 5 reps.
    • Then add a rep whenever I could until I hit 10 x 10.
    • Increase the ‘bell size and repeat.
    • And I’ve done that and worked all the way up to the 92kg kettlebell.

Simple? Yes.

Effective? Very.

If you’re wondering how frequently you should do this workout – here’s your answer:

— Do it at the end of your strength training sessions or on your ‘off’ days.

— Start off doing it once a week, then increase to 2 or 3 times a week on non-consecutive days. Do not worry about burning out. The explosive nature of the swing means that it’s pretty easy to recover from.

Give it a try (starting with a size of kettlebell appropriate to your strength level).

Of course, the swing on its own won’t give you an outstanding deadlift. It’ll build your work capacity. It’ll make your ‘deadlift muscles’ strong. And it’ll give you a vice like grip.

But, sooner or later – you have to do some deadlifts!

In my new book – The Big 3 – I explain exactly how to perform your deadlifts, squats and bench presses correctly.

You’ll also get a simple, yet highly effective program for ramping up your strength very quickly on those 3 lifts. Throw in some 2-hand swings and you have a program that’ll make you truly STRONG.


Learn more about ‘The Big 3’ in Andy Bolton’s new book

the swing sandwich

$
0
0

By Pavel Tsatsouline, Chairman


For years, kettlebell instructor Missy Beaver has been placing a set of swings between sets of everything else.  She has had great success with her students who range from professional athletes and fighters to celebrities.  All have seen impressive improvements in performance and body composition.


Missy Beaver


Or consider Master SFG Dan John’s hit workout that calls for alternating very low rep sets of “grinds” and high, up to 50, rep sets of light swings.  Among its many benefits is training one’s ability to quickly recover from many brief alactacid efforts aerobically—a very valuable asset for fighters and team sports athletes.


This “Swing Sandwich” has also built a reputation for rapidly improving one’s body composition.  It builds the muscles targeted by the exercises done between swings and burns fat at the same time.  The hypertrophy seems to be the result of a hormone spike promoted by the swings.  Some Russian sports scientists such as Prof. Victor Selouyanov advocate sandwiching sets of full body exercises like squats between sets of upper body muscle building exercises to benefit from this spike.  Kettlebell swings appear to have the same effect.


If strength is important to you, do not train this way exclusively.  There is no way of avoiding multiple heavy low rep sets with plenty of rest between them.  Keep up this type of pure strength work once or twice a week and add “swing sandwiches” on two or three more days.


On your heavy days press a 75-85% 1RM bell for many sets of 1-5 reps and a plenty of rest.  Total 25-75 reps per arm.  Ladders are strongly recommended.  In other words, it is the heavy day from the Rite of Passage from Enter the Kettlebell!


On your swing sandwich days press a lighter, 60-70% 1RM, kettlebell for sets of 4-6 reps, totaling 25-50 reps per arm.  Keep the rest periods down to a minimum.   It is up to you to select the swing loading parameters: one- versus two-arm, weight, reps, rest periods.


Some options for your weekly military press and swing schedule:


1

2

3

Monday

Sw. Sand.

Heavy MP

Heavy MP

Tuesday

Sw. Sand.

Sw. Sand.

Wednesday

Heavy MP, Sw.

Thursday

Sw. Sand.

Medium MP

Friday

Sw. Sand.

Sw. Sand.

Saturday

Sw. Sand.

Sunday


Option #1 is the least effective—but most efficient.  Note that on Wednesday you have a swing session following the presses.  As an option, feel free to add an additional swing workout on Saturday.


Option #2 adds an extra swing sandwich day for those prioritizing muscle building.  You may swing after your presses on Monday.


Option #3 is the preferred one for most experienced gireviks.  On the medium press day do what you did on the heavy day but reduce the volume by not climbing your ladders as high—the ROP medium day.  Feel free to add an additional swing workout on Saturday and perhaps another one on Wednesday.


Enjoy your sandwich!


Hinano Cafe, Venice Beach


Optimizing Back Health With The Kettlebell Swing

$
0
0

by Scott Iardella, SFG II SFL

We all know the kettlebell swing has many benefits. Would you put “back health” at the top of the list? I would. What exactly is back health? Back health means having a strong, powerful back that’s free from injury. Being free from injury is one of the biggest benefits I’ve personally experienced with the kettlebell swing through the years.

You already know that the swing is a high power full body explosive movement that doesn’t stress the back, when it’s executed properly. But, I would say that it’s one of the most effective exercises for total back health that we have available to us. Let me give you some reasons why.

For example, World Powerlifting Champion, Brad Gillingham has directly attributed the kettlebell swing as a key factor with his return to competition after several failed rehabilitation attempts.

Brad Gillingham

Brad Gillingham uses kettlebells to keep his back healthy

I should also give you some background and perspective on my own experiences related to back health. Many years ago I experienced a severe disc herniation in the lumbar spine at level L4-L5, which is a common site for disc herniation.

The experience was one of the most painful and devastating things I’ve ever been through in my life. The rapidly progressive radiating pain in my left leg was so severe, there was no position I could find that would alleviate it. This means I couldn’t sleep, let alone perform any normal functional activity. It wasn’t long after my injury that I had a surgical discectomy to alleviate the pain. The road back from surgery was a long one, but a successful one, which is another story in itself.

How bad was the pain prior to surgery? The disc herniation was so severe I had what’s termed “sciatic scoliosis” which is a lateral curvature of the spine as a result of the sciatic pain (the disc herniation). In other words, I literally couldn’t straighten my spine because it made the excruciating and constant pain even worse. Imagine that. It was a bad situation that escalated quickly until my surgery.

As with most adversity, great things usually come out of it. It ultimately led to me becoming a physical therapist (PT) and working with many back pain patients through the years and helping a lot of people. To this day, this is why I have the utmost respect for optimizing spinal position with training. This something I take very seriously for myself and for those I work with.

The point of all this? I understand back pain much more than I would have ever wanted. The experiences provided a total appreciation and unique perspective on the importance of optimizing back health.
 

THE LANDMARK MCGILL STUDY

First, we need to remember that no one study alone answers all the questions and cannot be used to make broad conclusions. Instead, we must view each study as a piece of the puzzle in the entire body of evidence in a particular area. With this understanding, there were some key findings in the landmark study by Dr. Stuart McGill looking at the biomechanics and muscle activation of the one handed kettlebell swing.

A key question the study looked to answer was if the kettlebell swing had a unique loading benefit that may be perceived as therapeutic for some (ex. Gillingham, myself, others) yet could potentially cause discomfort in other people? Let’s be clear, technique has a lot to do with how a person would expect to feel during and after performing the kettlebell swing, I think we all agree on that.

It should be noted that subjects in the McGill study did not have any current or previous low back issues. The study also included a single case study of the kettlebell swing performed by none other than Pavel Tsatsouline. As with most kettlebell studies to date, the kettlebell size used was a 16 kg kettlebell for the swings, with the exception of Pavel who used a 32 kg kettlebell, more on this in a minute.

Pavel at Prof. McGill’s lab at the University of Waterloo, Canada

The swing technique was the standard hardstyle technique, but did include “kime” at the top of the swing. Kime is a brief muscular pulse at the top in an attempt to elicit a rapid muscle contraction-relaxation.
 

MUSCLE ACTIVITY

If you’ve performed a swing, you know there are many muscles that are activated. In the study, EMG (electomyography) was conducted to analyze the muscle firing of the following:

Rectus Abdominis
External Obliques
Internal Obliques
Latissimus Dorsi
Erector Spinae
Gluteus Medius
Gluteus Maximus
Rectus Femoris
Biceps Femoris

While all of these muscles are important, the hip extensors, specifically the gluteals are of great importance during the swing. The term “gluteal amnesia” is commonly used in the fitness community to describe the lack of firing in the glutes for many key exercises. Glute activation is one of the most powerful phenomenons of a properly executed kettlebell swing and many other athletic, power exercises.

Glute activation is so important that even the great Tiger Woods made a recent comment after a poor showing in a golf tournament about his glutes. He stated the following, “It’s just my glutes are shutting off. Then they don’t activate and then, hence, it goes into my lower back. So, I tried to activate my glutes as best I could, in between, but it just they never stayed activated.” These were actual comments following his withdrawal from the tournament. Just a thought, but maybe Tiger would benefit from a kettlebell swing.

Back to the McGill study. The study demonstrated significant results in regards to glute activation with the most impressive numbers produced by Pavel’s one hand swing. Pavel generated such powerful muscle activity, his contralateral (opposite side) gluteal muscles fired at 100% MVC (maximal voluntary contraction). Without question, the one hand swing is a proven solution to activate the glutes.
 

SWING FORCE: COMPRESSIVE VS SHEAR

The study also revealed an interesting ratio of compressive force to shear force. Let me explain. If we have 2 spine vertebrae, think of the compressive force being the downward pressure of the top vertebrae on the vertebrae below it. This downward pressure is the compressive force.

If we have the same 2 vertebrae, visualize the one on top being forced forward relative to the one on the bottom. This is the shear force. Understanding how these 2 forces impact the spine are significant considerations for the kettlebell swing, according to the data by Dr. McGill.

The findings of the study demonstrated that the forward acceleration of the kettlebell in the swing phase produce increased posterior shear forces in relation to compressive forces. You may expect this due to the mechanics of projecting the kettlebell horizontally. If you compare this to a deadlift, for example, you’d expect more compressive force due to the downward pressure of the load and maintaining a vertical path of the bar.

Swings require stability, yet they also promote stability. If there is true instability of one or more vertebral segments, then according to the McGill data, it would make sense that those exposed to posterior shear loads could potentially have intolerance with kettlebell swing. An important point to remember here is that these types of cases are quite uncommon, but they do exist.

The study concludes that the majority of people should greatly benefit from the effectiveness of the kettlebell swing to strengthen the posterior chain, but there may be isolated cases who may experience shear load intolerance and may not be ideal candidates.


SUMMARY AND CONSIDERATIONS

Fat loss, explosive strength, a high level of conditioning, posterior chain development, and forging athleticism are all proven benefits of the kettlebell swing. One of the major benefits we don’t always consider is optimizing back heath. When it comes to back health, the swing can be considered a foundational exercise for the majority of people because of the unique features that as discussed here.

The swing greatly contributes to high levels of muscular activation in the posterior chain, as well as abdominals. The hip hinging mechanics, neutral spine, and powerful strength and conditioning benefits make it one of the most innovative movements we have to optimize and restore back health. As a former back patient and rehabilitation professional, I would conclude that the properly performed kettlebell swing is essential for a high performing and pain free back for most people.
 
References:

McGill et al, Kettlebell Swing, Snatch, and Bottoms Up Carry: Back and Hip Muscle Activation, Motion, and Low Back Loads. JSCR Volume 26, Number 1, January 2012, pp. 16-27
 

About the Author

Article by Scott Iardella, MPT, CSCS, CISSN, SFGII, CK-FMS, USAW. Scott is an SFG Level II and SFL Instructor, former Orthopedic/Sports Medicine Physical Therapist, and has diverse credentials and experiences in strength and performance training. Scott trains and teaches in South Florida. For more information, go to RdellaTraining.com.

To learn more about the proper way to do a kettlebell swing, attend a Kettlebell User Course and/or Find an Instructor.

Further Reading: My Journey to the Kettlebell by Dr. Stuart McGill


StrongFirst for Golf

$
0
0

by Chris Hook, TPI-FP3, SFG2, SFL

Tiger Woods in 2014

You may not be a golfer or a fan of golf, but I am sure you have heard of Tiger Woods. He has been ranked the number one golfer in the world many times. However, in the last few years we have seen Tiger Woods withdraw from many tournaments due to pain or injury. Last year he underwent a microdiscectomy, which sidelined him for most of the season. In his first event of 2015 he withdrew due to back pain. In his second event of the season he withdrew after 11 holes. He was quoted as saying, “My glutes are shutting off, then they don’t activate and then, hence, it [pain] goes into my lower back. I tried to activate my glutes as best I could, in between, but they never stayed activated.”

Glute Activation

The public and media have made this statement into a bit of a butt joke. However, for those of us in the strength and conditioning community, we run into Gluteal Amnesia on a regular basis. Gluteal Amnesia is a real thing. It refers to an inhibition or delayed activation of the gluteal muscles, which can lead to weakness of the muscles over time and the recruitment of other muscle groups to perform the function of the glutes. The glutes play an important role in hip extension, stabilization of the pelvis, and positioning of the legs.

The community of SFG certified professionals applies the kettlebell to very diverse populations; everyone from MMA fighters and Tactical Athletes, to people that want to get in better shape. I use the SFG principles along with kettlebells, barbells, and progressive body weight movements to increase performance for golfers. Kettlebells and training for golf performance are a perfect match. Turkish Getups, deadlifts, squats, presses, pull-ups, swings, snatches, bent presses, windmills, and all of the other standard Strong First movements are a fantastic recipe for improving golf performance.

Kettlebells build strength for many sports

Training for Golf does not have to be Complicated

Golf fitness training has become more mainstream over the last decade due to the Titleist Performance Institute (TPI), which has a golf specific screening process. For those of you who don’t know, TPI combines the expertise of the medical professional, golf coach, and fitness professional. This provides the golf athlete with treatment for pain, concepts for swing and game development, and strength and conditioning to eliminate movement dysfunction, asymmetries, and limitations. Often times a biomechanical limitation prevents a golfer from efficiently performing the golf swing. Once limitations are removed a golfer will have a better chance of making changes to their golf swing and eliminating swing faults. The TPI certifications are very compatible with the FMS screen.

We can all agree that golf is a rotational sport, but sometimes doing more rotation doesn’t provide your body with the adaptations it needs to make your swing better. Does it have to look like golf to improve your golf game? Of course not, but many of the exercises that are presented in the media to golfers are rotational movements because little explanation is needed to communicate their likely positive benefit to the golf swing. Squats may seem like a generic movement with little carryover, but their benefit to your swing and your daily movement patterns are numerous. Training for golf does not need to be over complicated with 26 different rotational movements tied up with stretchy bands.

If you have a loss of posture in your golf swing, learning to squat could be the secret ingredient to being able to maintain your posture through impact. If you cannot maintain posture in your golf swing, working on hand position or creating more lag is just a waste of time. TPI has connected Early Extension (losing your posture toward the ball) to the inability to overhead deep squat. If you are an FMS practitioner, this should be a light bulb moment. The SFG/FMS professional might not realize that they already have all of the tools to work on golf performance, but just need to connect the dots.

Enter Turkish Get-ups

Learning to squat properly is vital for golf posture

Could there be a more golf specific exercise than the Turkish Getup that also restores functional movement qualities?

A well done TGU should be deliberate and graceful. It incorporates reaching, rolling, separating the upper and lower body, scapular stability, cervical mobility, thoracic mobility, trunk stability, stepping pattern, hip hinging, and grip strength just to mention a few benefits. It is a movement that can help restore left and right symmetry to the body. This is an important benefit to golfers because the golf swing is a repetitive and violent asymmetrical movement. But what if you need mobility? The Turkish Getup does that.

What if you have mobility and you need more stability? Well, you’re in luck, the TGU does that too. The TGU makes you strong and flexible. It will open your hips, improve rotator cuff function, enable a better hip hinge, and make you a cup of coffee while you are switching the bell to the other side (well maybe not, but it sure does provide many benefits.). The TGU is a contralateral pattern that involves tremendous proprioception, much like your golf swing. It is great movement prep prior to playing a round, and it provides a good bang for your buck when budgeting time for exercise. If you were to visit us here at Golf Fitness Los Angeles you will likely see someone doing a TGU or pieces of one in preparation for lifting, to address a limitation, and of course to build a heavier TGU. It is easy to see how the TGU has carryover into the golf swing. Any SFG certified kettlebell instructor can teach the subtleties of mastering this movement.

Turkish Get-Ups at Golf Fitness Los Angeles

The more grip strength an athlete is able to produce, the more activation he/she will get in the rotator cuff. Doing exercises that put a demand on the grip has a strength-building effect on the muscles of the cuff, which are important to golf because they stabilize the shoulder as it goes through flexion, extension, abduction, adduction and internal/external rotation. Many shoulder injuries happen due to scapular instability. You just can’t use a kettlebell properly without growing your grip strength. Improved grip strength will improve power output at impact and clubface control at the top of the back swing.

Additionally, a limitation in T-spine mobility will force an athlete to compensate by destabilizing the cuff to rotate with it in place of the T-spine. T-spine functionality goes hand-in-hand with scapular stability. To get the cuff strong and stable, the T-spine it is connected to, needs to be able to do its job of extending, flexing, and rotating, which is how it is required to move in the golf swing. You can do stretchy band internal/external rotations all day (and there is a time and place for that according to some people), but real scapular stability comes with improving grip strength. Bottom’s-up kettlebell carries anyone? All of these important pieces to an efficient golf swing are woven into the many movements we use with kettlebells.

These are just a few examples of how our Strong First methods and tools can be of benefit to the performance needs of the recreational and professional golfer. I am sure I don’t need to mention the value of the kettlebell swing as a powerful hip hinging movement that helps an athlete create greater ground force production. That one is obvious, right? Our tools are versatile across many populations, including golfers.

According to Tiger, he is missing some glute activity. Tiger is doing us all a favor by bringing attention to a concept that is the corner stone of most of our lifting. My athletes now joke about their glutes being more active than Tiger’s. The kettlebell, the barbell, the pull-up bar, and body weight movements can be the best golf performance tools, you just need to be able to communicate to golfers what the connection is to their golf swing. Golfers quickly come around to our methods. They don’t have flimsy goals. Their goals are always clear, measureable, and generally the same: to hit the ball farther, have a better golf swing, play better golf, and prevent injury. Kettlebells do that.

first photo courtesy of Wikipedia

About the Author

Golf Fitness Chris HookChris Hook, TPI-FP3, SFG2, SFL, FMS
Chris uses the techniques he learned from the StrongFirst Kettlebell and Barbell courses to assist his vast knowledge of training golfers. His goal is to take golfers of any level to the next level. His goal is to help changing the way people move, make them feel better, and hit the ball further. For more information, go to Golffitnesslosangeles.com/.

To learn more about the proper way to do a kettlebell swing, attend a Kettlebell User Course and/or Find an Instructor.


Military Deployment Prep: A Program for Hardening the Soldier

$
0
0

by Al Ciampa, MS, SFG, FMS, ACSM, USAW

When Pavel asked me to make a contribution for an article, I was honored. His request was made in a forum post discussing the preparation of a combat unit for the mountains of Afghanistan. As military deployment prep is more or less what I do professionally, I thought I would provide an overview of my philosophy, as well as expand on the ideas from that forum thread.

Al Ciampa StrongFirst

Al Ciampa knows how to handle military deployment prep.

Prior to a discussion of training prep, let me share what I have come up with as a general algorithm of movement foundation that not only allows the military elite to perform better, but also works well with the unhealthy population I serve as part of my profession. You’ve heard this all before and there is nothing new here, but I’ve witnessed this algorithm solve a lot of problems.

Step 1: Crawl

In the very fitting “crawl, walk, run” method of training in the military, the first step is crawling. Tim Andersen and Geoff Neupert of Original Strength turned me on to this. Now, we teach proper diaphragmatic breathing, and then use crawling to train it. It’s difficult to breathe into the chest and shoulder girdle while your upper body is dynamically loaded in this fashion.

Get up on your hands and feet and crawl forward and reverse as part of the warm-up. It doesn’t require a long distance, but does require a certain technique. As Anderson and Neupert explain: keep your butt down, chin and chest high, move the opposite limbs together, and strive to pull the knee outside the elbow as high as it can go.

Our best crawlers move slowly and their limbs move almost independent of the pelvis and spine. Crawling is the foundation of movement and accomplishes everything I see most people spend hours attempting to attain: distracting with bands, foam rolling, stretching, “mobility” work, more bands, etc. But crawling achieves all the same goals in a fraction of the time. Remember, military application – there are many more things to worry about other than PT.

Step 2: The Get Up

Once you own the ability to crawl (though you can surely work on both together), start practicing the get up as described by Pavel in Simple & Sinister. Seek to transition gracefully between positions, own each position when there, and push the loading up as you develop your get up.

Where crawling ties Dan John’s knots together, provides mobility, and offers body control, the get-up does the same under slow loading. Recently, I had a 6’2”, 240lbs lean and strong (powerlifting) airman get crushed by a 16kg bell in the get-up and fail to crawl with any sort of control. If this is you, go back and rebuild the chassis.

Step 3: The Swing

The swing now takes your graceful movement under slow loading and turns flesh into steel through ballistic loading. Again, you should refer to Pavel’s work, so I won’t repeat what’s been said. These three skills don’t have to be ordered, except that if you can’t crawl well, maybe spend more time crawling and less time doing get-ups and swings, and do them with lighter loads. If you’re not graceful with your get-ups but crawl well, ease off on the swing loads for a bit. You’ll be surprised to see how these three skills work off of each other, and improve almost together.

The Specifics: Military Deployment Prep

Okay, let’s get to the meat: more bang for the buck – this is the overall theme for a military application. Yeah, it’s awesome, all of the sexy exercises we have to choose from, between CrossFit and Arnold’s encyclopedia, but if a movement is superfluous or unnecessary, then ditch it.

Swings

One-hand swings should be performed as described in Simple & Sinister. Two-hand swings have to be overspeed. But here’s my version, an excerpt from my training manual:

“A proper swing is a tug-of-war between the opposing body lines: posterior v. anterior. The glutes, hamstrings, and quads forcefully catapult the bell forward, while the lats, abdominals, and hip flexors catch it and throw it back—compress the posterior spring, fire the spring, compress the anterior spring, fire that spring, then do it again. Both the hinge and plank position are maximally tight—maximum feed-forward tension—for the time the bell spends flying out, one is “relaxed- tight”.

Throw the bell from the coiled spring of the hinge into the tight plank—stay connected to the bell—”catch” it in the plank and throw it back down. Recoil the spring and snap back to plank. Repeat for a set of 10. Check your heart rate. Wow.

Most people have a lot of trouble with this when they first start swinging—just get the basic pattern down and be patient. Use an appropriate load. My progression to this very violent overspeed swing is to train a floater swing first—the default swing of the StrongFirst community. Floater swings consist of driving the hips explosively, throwing the bell into a tight plank, however, the bells ascent is not arrested but is allowed to “float” momentarily at the top of the arch. The bell should then be guided back down into the hinge without too much effort. These swings concentrate on hip extension power.

It is important to train this initial version of the swing before you begin to overspeed them—train them until you’ve burnt the motor program into your brain, perhaps about 3-6 months. Hear this: if you include over-speed swings into your training too early, that is, before you can float swings gracefully and powerfully, without much thought, you will degrade the mechanics of both swing types and get no where at best, injury at worst. Be patient, put your hours in on the floaters, then include a few overspeed swings as you progress.

A word on sit-ups here: I don’t advocate training sit-ups regularly, in fact you should only perform them on test day. If folks performed sit-ups properly, then there is a possibility that they wouldn‘t cause problems. However, most do not perform them correctly, especially under testing situations, and so even a short stint in the Military can lead to life-long low-back pain. Sit-ups place the lumbar spine against the ground to be used as a fulcrum to fold the body in half over—something it did not evolve to support. If you do sit-ups properly—that is, keep the midline open and lead the action from the chest, only flexing only at the hip—then the most you’ll probably get is a sore tailbone. But that technique costs a lot of energy and requires a lot of strength, so most members I monitor perform them in trunk flexion followed by hip flexion—and there’s where the problem exists. Do your heavy-ish swings to improve your sit-up numbers.


Use the swings in the Simple & Sinister fashion with a twist: 10 x overspeeds, 10 x right, 10 x left, for 3-4 total rounds (90-120 total swings). Do these 3-5 times per week. I even like this swing session after a long ruck.

Foot March

You can’t get around LSD work for aerobic capacity, from fatty acid metabolism to mitochondrial function, these “loaded carries” for distance harden the body and prep the physiology for the future environment. Pavel talks about “losing weight without the dishonor of aerobics,” and I agree, but don’t take it out of context. Here, we’re prepping for function, not fooling around on a stair master watching Oprah.

It is not clear if power work (re: Simple & Sinister) alone provides physiological changes in mitochondria that contribute to the conditioning increases.1 A controlled carbohydrate diet, too, does not offer changes at the mitochondrial level, but does increase the efficiency of fatty acid use.1 We do, however, know that LSD training at low heart rates, as per Lydiard/Maffetone, increases mitochondrial volume and output, and so, endurance performance.2

So, you can run slow for distance to get the effect or you can walk quickly with a load for distance to get the same effect. Put a heart rate monitor on, ruck fast, and then run slow. Then compare your numbers. You’ll find the same aerobic effect from the two training efforts. So, let’s use the one with the secondary benefits that allow for peak performance in the specific environment we face. There is no substitution for efficient fat metabolism and mitochondrial function while under load in a mountainous environment.

Two walks per week are the minimum – one short, quick, and heavy; and one long, lighter, and slower. Use the short one to work the balance between the glycolytic and oxidative systems, and to prep the body for the daily loaded patrolling. Use the long one to really stoke the fires of the oxidative system. Keep your heart rate low and push it out for five or six hours.

Military Deployment Prep Program

The swings and walks will cover all the bases for power, endurance, and energy systems training. The heavy get-ups will take care of your strength work. Crawling will fill in the holes in most people’s movement. There’s the minimum.

If you have time and resources, do the deadlift, military press (use the single-arm kettlebell press), and pull-ups. Find Pavel’s Power to the People and do timed singles. These work well for strength and save time. Do this two to four times per week – and use the appropriate loads. See Easy Strength. If you have more time, sub out one or two of the swing workouts for five to ten minutes of long cycle clean and jerks or snatches – or roll the dice, as in Enter the Kettlebell.

Sample Week

Monday:

  • Crawl
  • Deadlift
  • Get-ups
  • Swings

Tuesday:

  • Crawl
  • Short walk
  • Press
  • Pull-ups

Wednesday:

  • Crawl
  • Deadlift
  • Get-ups
  • Swings or Clean and Jerks or Snatches

Thursday

  • Long walk
  • Optional: Swings

Friday

  • Crawl
  • Deadlift or swings
  • Presses or get-ups
  • Pull-ups
  • Sprints: 10 x 100m or 7 x 200m or 5 x 300m or 3 x 400m
  • Recover between efforts. Don’t do sprints if you chose swings over deadlifts.

What About Running, Push-Ups, and Sit-Ups?

Most units in prep do two sessions per day, so split these up as you see fit. What, no running, push-ups, or sit-ups? You’re not going to be doing much running overseas, so don’t fall into the, “We’ve always done this, so we’re gonna do this” mentality when it comes to running. I’ve already discussed sit-ups, and if you’re not scheduled to take a PT test, you don’t need to waste your time with push-ups.

Now, understand that push-ups are a specific enough event that if you don’t practice, you won’t nail your best numbers on the test. But your swings and get-ups will keep you close, so not much practice is required before the test. Just practice your high-tension techniques as you move (Pavel’s Irradiation concept), and your push-up muscles will stay in shape assisting the movements in the program. (Of course, don’t consciously stay tight while crawling or foot marching – this is reflexive tension).

Conclusion: What’s Critical for Military Deployment

There’s my take on deployment prep: applicable, minimalist, and effective – backed with both science and experience. Crawling is critical. The swings are critical. The heavy get-ups are critical. The walks are critical. Not necessarily in that order. Some variation of this has worked well for me and for those I’ve advised for many years now.

References:

  1. Hopeler, H., & Fluck, M. (2003). Plasticity of skeletal muscle mitochondria: Structure and function. Medical & Science in Sports and Exercise 35(1) 95-104.
  2. Seiler, S., & Tonnesen, E. (2009). Intervals, thresholds, and long slow distance: The role of intensity and duration in endurance training. Sportscience 13(1) 32-53.

Al Ciampa has been a barbell athlete for 25+ years; a former powerlifter and bench press specialist, he has a raw bench press of 605lbs in training and 585lbs in competition, at the time, setting an IPA record. He served in the US Army first as a LRS-D team member, then as director of the Army’s hand-to-hand combat program in South Korea: Modern Army Combatives Program. After his service, he co-opened and led training for a fitness and health & wellness center, specializing in strength & conditioning, and nutrition that served Military units and the local public. Feeling a want to support the Military again, he now works as an exercise physiologist and health educator for the US Air Force, specializing in rehabilitation, strength & conditioning, nutrition, and instructor development. He has a MS in sports and health science; certified SFG I, FMS, ACSM, and USAW; and has been recognized for excellence by the Secretary of Defense, Mr. Chuck Hagel.

“Losing Weight Without the Dishonor of Aerobics.”KETTLEBELL SIMPLE & SINISTER

The post Military Deployment Prep: A Program for Hardening the Soldier appeared first on StrongFirst.

Simple & Sinister: Getting from Two- to One-Hand Swings

$
0
0

By Steve Freides, Senior SFG

Adding one-hand kettlebell swings to your Simple & Sinister training can be daunting for some people. Some of the symptoms include:

  • Grip – you feel like the bell is going to fly out of your hand.
  • Posture – you feel unable to maintain a forward-facing torso when the weight is in one hand.

First things first – there is no magic solution to your problem. You aren’t strong enough yet at one-hand swings. But since you feel more than able to complete the number of two-hand swings the program gives, you need a way over this particular hump.

Performing your single-hand swings with a lighter weight is one option – and a good option, but not necessary for most people if you have first reached the program’s requirement by using only two-hand swings. Instead, try the approach I’ve outlined below – and finally let go of that extra hand.

One-hand swing

Learn to let go and achieve your one-hand swing.

How to Read This Swing Program

Within a single set of 10 repetitions, mix two- and one-hand swings. I credit Master SFG Brett Jones with introducing this concept to me.

Here is your first set of 10 reps – shorthand explained in a moment:

  • 2T +  2L +  2T +  2R + 2T

That’s 2 two-hand, 2 left hand only, 2 two-hand, 2 right hand only, and 2 two-hand to finish.

Note: I drove five hours and paid for a hotel in order to attend a four-hour workshop by Mr. Jones, and then arranged for him to work with me one-on-one afterward before I got back into my car for the five hour drive home. If you need in-person instruction, make no excuses – look up an SFG in your area and arrange a training session or get yourself to the nearest SFG if none are nearby.

Why You Will Mix Two- and One-Hand Swings

The reason you will mix single-arm and double-arm swings in a single set is to allow your two-hand swing to “teach” your one-hand swing. Feel the amount of explosiveness in your two-hand swing; note the “float” you achieve at the top of each rep; acquire a feeling for how long you wait before moving your hips out of the way of the descending bell, and for quickly you change the bell’s direction at the backmost place in the swing – and now try to duplicate these things in your one-arm swing.

It goes without saying that most people will find one side works better than the other, so also allow your strong side to learn from your stronger side. Note: we don’t have a “weak” side at StrongFirst, only a strong side and a stronger side. Thank you, Master SFG David Whitley, for that perspective.

Why two reps? A single rep each side isn’t going to be enough to let you get a feel for how you’re doing with your one-arm swing on that side – but two will suffice.

How to Follow This Kettlebell Swing Program

Perform as many of your sets of 10 in the above format as you feel appropriate for your current level of prowess at the one-arm swing. If you are doing 5 sets of 10, try it for your second set before returning to two hands for the remainder.

You do not need to wait until you are doing 10 sets of 10 two-hand swings before introducing the one-armed swing to your training. Try a little, see what you think, continue to perform one-arm swings if your good judgment says this is an option for you.

A Sample Progression

One way to increase the intensity of your swing workout – and therefore to make progress – is to keep the rep count and set count the same but increase the number of one-hand swings. You might progress like this – each line represents a single day’s swing workout.

  1. 50: 10T x 5 (10 two-hand swings x 5 sets)
  2. 50: 10T x 1, 2T+2L+2T+2R+2T x 1, 10T x 3 – one set, 4 one-arm swings
  3. 50: 10T x 1, 2T+2L+2T+2R+2T x 2, 10T x 2 – two sets, 8 one-arm swings
  4. 50: 10T x 1, 2T+2L+2T+2R+2T x 3, 10T x 1 – three sets, 12 one-arm swings

Then, at your next workout:

  1. 70: 10T x 7

In the last workout above, you have temporarily abandoned the one-arm swing as you perform a greater total volume. When you feel ready, you may then start adding one-hand swings back into your 70-total swing workout, and so on.

Workout Math

At some point along the way, you may feel confident enough in your one-arm swing to want to do more than two a time. Bravo! Make it so! You need to be able to count to ten, and add a string of numbers that equals ten, in order to do this. If that’s a problem for you, spend some time working on arithmetic, please.

  • 2T + 3L + 2T + 3R = 10 reps

The above yields 6 single-arm swings out of 10 instead of the previous total of 4 single-arm swings.  A 50% increase per set – nice!

A further increase would be:

  • 1T + 4L + 1T  + 4R = 10 reps

We’re now at 8 single arms swings out of 10 – you’re almost there, and moving to all one-arm swings is sure to be in your near future.

Mix and Match

Note that all these intermediate formats can be mixed. Below is a single workout, with each set on a separate line for clarity. 50 reps, pyramiding the number of one-arm swings

  1. 10T x 1
  2. 2T + 2L +2T +2R + 2T
  3. 2T + 3L + 2T + 3R
  4. 2T + 2L +2T +2R + 2T
  5. 10T

You’ll have finished 50 swings with 14 single-handed.

Conclusion

Feel free to switch left and right hands in everything above – find which order works best for you, or switch between them if both sides are fairly equal and you can keep track.

The instant feedback you receive when switching between two- and one-hand swings can be an extremely valuable tool in your quest for the ultimate explosive expression of the final Simple, and eventually the final Sinister workout in Pavel’s Kettlebell Simple & Sinister. Pay attention to your form on every rep, and use what you can already do well to help you improve the movement patterns at which you aren’t as strong.

I hope this helps you achieve your goal – please drop a note on the StrongFirst discussion forum to tell me of your progress.

Dr. Steve Freides

The post Simple & Sinister: Getting from Two- to One-Hand Swings appeared first on StrongFirst.

Simple & Sinister Training for Kettlebell Sport Athletes

$
0
0

By S. H. Mathews

If perfection is found when there is nothing more to take away, then Simple and Sinister is much closer to it than the program minimum from Enter the Kettlebell. Swings and getups. Clear numbers, clear goals, a crystal-clear progression.  Nothing to take away, but plenty of room to add other work to meet one’s goals.

Simple and Sinister is designed to augment an athlete’s primary training. It is designed to add strength and conditioning to the training regime of a martial artist, tactical operator, powerlifter, or other athlete. What about athletes who compete in kettlebell sport? Is Simple and Sinister a good fit for those athletes?

Pavel Tsatsouline does the kettlebell swing.

Pavel demonstrates the hardstyle swing.

Hardstyle vs. Sport-Style

A distinction is often made between hardstyle lifting and sport-style lifting. This distinction is often amplified by those who have no strong grasp of either style. Yes, they are different approaches to lifting kettlebells, but they are not contradictory or mutually exclusive. 

In hardstyle lifting, the athlete applies maximum or near-maximum force to complete each lift. In sport-style lifting, the athlete applies just enough force to complete the rep, saving his energy for the next rep. And the next. And the one after that, for up to ten minutes.

There are differences in technique as well, in accordance with the different goals of the two styles of lifting. There is not a good style and a bad one, or safe and unsafe, or strong and weak. Just as a hardstyle karateka can benefit from practicing Judo, or a powerlifter may supplement his slow-grind deadlifts with explosive power cleans, sport-style lifters can benefit from hardstyle training. Depending on their goals, hardstyle lifters may find that sport-style lifting is beneficial for them as well.

The Qualities Needed for Kettlebell Sport

The question to ask about any assistance program is whether it will provide physiological qualities necessary and useful for one’s primary sport. What does a competitive girevik need? If I had to reduce it to a minimum, I’d say cardiovascular endurance, an explosive lower body, and a stable upper body.

Cleans, jerks, and snatches are powered by the legs and caught by the arms in the rack or overhead. The legs and hips are the prime movers. A strong core links the lower body to the arms for the pulls of the clean and snatch, and for the launch of the jerk. When the weight has been launched by the legs, it is caught by the arms in the lockout position. Explosive legs, stable shoulders, strong core. Lungs and heart that can handle the workload. Add grip endurance, and you have most of the physical qualities a competitive girevik needs.

What S&S Can Give the Kettlebell Sport Athlete

The staple movement in S&S is the heavy one-arm swing. I won’t give the program away here, but it calls for a high volume of one-arm swings in a short period of time, and encourages men to work up to a heavy kettlebell — 48k is the master plan.

Hardstyle one-arm swings build strong legs and hips that can extend explosively time and time again, just like the girevik needs for jerks, snatches, and cleans. Done in sufficient numbers, they build grip endurance. Simple and Sinister swings are harder and faster than anything most competitive kettlebell athletes will do on the platform. They make the legs stronger and faster. They carry over well to the more measured pace of competition lifting. They are to the girevik what sprinting is to the middle distance runner. When I’m doing S&S swings my heart rate regularly exceeds 186 beats per minute, and I’ll hit triple digit swing reps in under five minutes with a 32k bell. It makes long cycle with a pair of 24k bells seem almost easy. Almost.

The other movement in Simple and Sinister is the get-up. Again, the plan tells the athlete to go heavy and get strong, and to compress rest periods. The get-up restores tired shoulders and builds strength and stability overhead — just where the competitive girevik needs it. Snatches, jerks, and long cycle all require solid, stable lockouts. Many competitions are now electronically scored, so a solid, motionless lockout from the bells to the ground is more important than ever. If they wobble around, the lift does not count. Weak, inflexible shoulders lead to premature fatigue, inefficient technique, and lost reps. The get-up builds upper body stability, particularly through the shoulder girdle, which every lifter needs on the platform.

Explosive lower body power, flexible upper body stability, a grip that won’t let go, and a heart and lungs that keep driving. These are things the competitive kettlebell athlete needs, and Simple and Sinister delivers. I’ve found it to be a great addition to my sport training. Typically, I’ll do a five to seven minute set of long cycle clean and jerks with 2x24k, rest for less than five minutes, then the Simple and Sinister program with a 32k. All the benefits of both hardstyle and sport-style lifting, in under 25 minutes a day.

A Complete Kettlebell Sport Program

While Simple and Sinister can be a great addition to a competitive girevik’s arsenal, it should not be the only accessory work done. Practicing the competitive lifts builds the qualities needed for domination on the platform, and Simple and Sinister reinforces these qualities, but most top gireviks find they still need some steady-state cardio — running, rowing, biking, skiing — whatever floats your boat.

Twenty to twenty-five minutes seems to be the sweet spot — enough cardio to power you through a ten minute set on the platform, but not so much that you compromise strength and power gains. I recommend alternating steady state cardio and Simple and Sinister on days after sport-specific training, or incorporating steady-state cardio at least two days a week.

S. H. Mathews is a competitive kettlebell lifter and martial artist. He holds the rank of Candidate for Master of Sport from USA Kettlebell Lifting. When not lifting kettlebells he teaches for several colleges, universities, and seminaries. 

The post Simple & Sinister Training for Kettlebell Sport Athletes appeared first on StrongFirst.


Posture: An Easy Way to Up Your Performance

$
0
0

By Pavel Tsatsouline, Chairman

Posture in AthletesWhat do the above photos of top performers in three totally different sports have in common?

Posture

  • What would happen to the sprinter if she were slouched over? A waste of her remarkable muscle power.
  • The full contact karateka’s devastating spinning kick would turn into a harmless wobbly spinning top.
  • The archer would not be able to align her structure for a perfectly stable shooting platform.

In a great majority of athletic events and real-life tasks, a ramrod straight posture, or at least its approximation, greatly improves the efficiency. So get your carcass rebalanced.

Don’t Row Yet

A common recommendation for improving posture is to row. Yet you can row until you are blue in the face, but unless you have excellent thoracic mobility, you will fail to balance out your development and could get hurt in the process.

Does it make sense to load a movement one cannot perform without extra load? Would you put a barbell on the shoulders of a person who cannot do a single competent bodyweight squat? The answer, of course, is no. By the same token, if you are unable to open your chest up with no external resistance, you should not be rowing with weights.

First: Soft Tissue Work

You need to overcome the fascia’s and other tissues’ internal resistance first. Various soft tissue work will help. So would a stretch with a yoga block.

Lie down on the floor with a wooden block the size of a brick under your upper back. The block is strategically placed at a specific spot to ensure you are stretching where it should. You need to hang out there for a long time to allow your shortened tissues to “ooze” over the block. The head is supported by a folded towel that limits cervical extension and lets one hang out longer. Many minutes later, slowly roll to your side rather than sit up.

There are subtleties to this. You are well advised to see a yoga expert.

Yoga Stretch for Posture

Abby Clark, SFG, demonstrates the drill and comments: “While resting on the yoga block, take a moment to make sure your rib cage is stacked over your hips. While you press your rib cage down, make sure your pelvis is not tucked underneath and your low back is touching the floor. Now that your ribs and pelvis are in the correct position, you can relax your arms down on the ground while diaphragmatically breathing to deepen the thoracic spine opener.”

Kettlebell Drills

Two powerful posture improving drills from the SFG curriculum are the kettlebell arm bar and the windmill.

Then: Strengthen the Position

Once you have sufficient passive flexibility to have good posture—you can assume the posture, you just cannot hold it long—it is time to strengthen the right muscles. This is where rows and such come in. But chances are, you will not even need to bother with rows and will get the job done with the kettlebell ultra basics alone, the goblet squat and the one-arm swing from Kettlebell Simple & Sinister. The goblet squat forces you to raise your chest and the swing pulls the shoulder blades together and extends the entire posterior chain, from the base of your skull to your heels.

A little attention to opening yourself up will go a long way toward getting more speed, strength, precision, and endurance out of your muscles—with no added effort. As a martial arts master said, “Posture is balance and balance is power.”

The post Posture: An Easy Way to Up Your Performance appeared first on StrongFirst.

The Perfect Kettlebell Swing: Is There Such a Thing?

$
0
0

By Brett Jones, Chief SFG

Of the great unsettled debates to plague humanity over the ages, the question of whether a perfect kettlebell swing form/technique exists would certainly be among them. Internet battles have raged and friendships have been lost all over the quest for the “perfect” swing. Sadly, far fewer swings have been swung than arguments held, but that is another story.

kettlebell swing

Does the perfect kettlebell swing exist?

Is There a Perfect Kettlebell Swing?

I am here to say once and for all that, yes — a perfect swing form/technique does exist. Or more accurately: there is a perfect swing technique for you. I’ll let that sink in for a moment.

There is a perfect swing for you and your individual structure and history. We will break each of those down a bit as we move along, but once the basic blueprint of this exercise called a kettlebell swing is tailored to you, we can begin the quest to find that perfect swing.

Kettlebell Swing Basics

Our quest begins with a basic blueprint of the exercise. The swing in its simplest explanation is a dynamic hip hinge. A basic blueprint of the hip hinge is well described in the picture below. Shoulders above hips, hips above knees, with a well-maintained spine.

Jeff Sokol kettlebell swing

Jeff Sokol, SFG II does a great job demonstrating good swing form.

Your structure and movement ability may influence how this looks, but two particular extremes are counterproductive and should be avoided:

  1. When the shoulders are even with or lower than the hips, the hip hinge has become more of a stiff legged deadlift with too much emphasis on the hamstrings.
  2. When the hips drop below the knees, the hip hinge has become a squat and that isn’t the goal when performing a swing.

Vertical Shins

The vertical tibia requirement is an intention and not a reality for many people. The ability to keep the shins vertical (another way of saying vertical tibia) is highly dependent on structure, and an individual should not give up the stability of their spine in order to achieve the intended “vertical shin.”

Below is a picture of Pavel swinging from several years ago. Note the shin angle. People are usually skeptical when I ask them to bend their knees more during their kettlebell deadlift or swing, but that skepticism fades when they feel how much more powerful their swing becomes.

Pavel kettlebell swing

Note the position of Pavel’s shins.

Stick to the basic blueprint of shoulders above hips and hips above knees with a well-maintained spine, and adjust the position to suit you.

Structural Variation

Structure is interesting, and we as a species have a tremendous amount of variation in ours. Tremendous amount of variation (repeated on purpose). So much so that it is estimated that upward of 40% of the population has a hip structure that falls outside of previously held “norms.”

We see it every day but sometimes fail to adjust the blueprint to it. Imagine getting in a friend’s car. You are 5’ 9” but your friend is 6’ 5”. Do you think you will need to adjust the seat and mirrors? I would think/hope so!

Short torso, long torso, short arms, long arms (is it just me or am I bordering on a Dr. Seuss story here), short legs, long legs, and any of these in every combination possible will impact how the blueprint is adjusted. Everything — to the degree of foot turnout — is adjusted to the individual. Structure matters.

Personal History

History includes injury history and exercise history and can impact exercise selection and execution. An individual that has never “lifted weights” before may have no concept of what a hip hinge is, whereas an experienced powerlifter will know the hip hinge immediately.

An individual with a history of a car accident and surgery on his or her lower back may be hesitant to learn the hip hinge whereas someone who has never been injured may jump right in without hesitation. Every history and individual brings something different to the kettlebell swing and this should be accounted for when teaching it.

StrongFirst kettlebell swing

Find a StrongFirst instructor so you can learn a proper swing.

Now that we have a blueprint and know to adjust it to the individual, I have a couple of additional tips for you: lats and rhythm.

Tip #1: Lats

During SFG Courses and Certifications, we make a big deal about getting the arms connected to the ribs during the kettlebell deadlift and swing. This activates the lats (latissimus dorsi for the anatomy police) and connects the upper body to the hips via the thoracolumbar fascia and increases your stability and power.

Basically, try to bring your armpit “down” to your hip without getting shorter during the eccentric phase of either exercise but realize that once you finish the drive to hip extension, the arms will come off of the ribs (otherwise it looks like Frankenstein trying to swing a kettlebell). Which brings me nicely to the second tip, rhythm.

Tip #2: Rhythm

There is a rhythm to the swing. Stand tall with your arms extended straight out from your shoulders with your hips extended. Slowly let the arms come down until the inside of the upper arm makes contact with your ribs, and then begin the hip hinge to the loaded or eccentric position. (Note: the inner part of the forearms will be hitting very high in the groin and pointing behind you — not at the ground.)

Now, begin the hip extension, returning to fully-extended hips (glutes tight) and standing tall. Once the hips finish their extension, then the arms come off of the ribs (“blown off the ribs” by the wave of power from the hip extension) and ultimately extend straight from the shoulders.

The breathing is also in rhythm, with a sharp inhale at the bottom/loaded position and a sharp exhale at the top. Practice this as an “air swing” and look for that rhythm during your full-speed kettlebell swing.

The Perfect Swing Is Your Swing

Remember that a “perfect” kettlebell swing is smooth, athletic, and powerful — and tailored to the individual. And now that this question of the ages has been answered, you can find an SFG in your area and prepare for an SFG User Course or SFG Certification. Happy swinging!

Brett Jones StrongFirstBrett Jones is a Certified Athletic Trainer and Strength and Conditioning Specialist based in Pittsburgh, PA. Mr. Jones holds a Bachelor of Science in Sports Medicine from High Point University, a Master of Science in Rehabilitative Sciences from Clarion University of Pennsylvania, and is a Certified Strength & Conditioning Specialist (CSCS) from the National Strength and Conditioning Association (NSCA).

With over twenty years of experience, Brett has been sought out to consult with professional teams and athletes, as well as present throughout the United States and internationally.

As an athletic trainer who has transitioned into the fitness industry, Brett has taught kettlebell techniques and principles since 2003. He has taught for Functional Movement Systems (FMS) since 2006, and has created multiple DVDs and manuals with world-renowned physical therapist Gray Cook, including the widely-praised “Secrets of…” series.

Brett continues to evolve his approach to training and teaching, and is passionate about improving the quality of education for the fitness industry. He is available for consultations and distance coaching by e-mailing him at appliedstrength@gmail.com. Follow him on Twitter at @BrettEJones.

The post The Perfect Kettlebell Swing: Is There Such a Thing? appeared first on StrongFirst.

Simple & Sinister Progression Tactic

$
0
0

By Pavel Tsatsouline, Chairman

Today we will discuss some nuances of your Kettlebell Simple & Sinister progression, inspired by lively discussions on the StrongFirst forum.

Kettlebell Simple & Sinister bookIn a nutshell, the program calls for 10×10 one-arm swings (five sets per arm), with the goal of eventually being able to do them in five minutes with a particular size kettlebell any time. It does not mean you should strive to hit your 100 swings in five minutes in every training session, though.

Al Ciampa, SFG, pointed out:

Training for an event, or competition is always different from the event itself: the intensity is usually lower, the distance or time is shorter/less, etc. But, our contemporaries would have you believe otherwise. So, in the current fitness context of boot camps, insane training programs, high-intensity this and that… well, of course, you are going to compete (read: try for the S&S goal) every session.

But in the same way that you do not run the marathon until the actual race… do not attempt the time standards of S&S until your “training is complete”. This “training” consists of many months, possibly years, of lower intensity swings and get-ups, i.e., training to your breath, HR, talk test, etc. No clock, no sense of urgency, no rush. Let the training provoke adaptations in your mind and body, then, and only then, apply those adaptations to the competition: the S&S time goal.

In the beginning, when the kettlebell is light, you might be able to do your 100 swings in five minutes every day. But as your poundages climb, an organic form of cycling tends to develop to comply with the non-negotiable rules of S&S: stay fresh every day and explosive every set. You can do it by training aerobically most of the days – that is resting long enough between sets to pass the talk test.

The Science Behind Simple & Sinister

Belying its apparent simplicity, S&S happens to have some fascinating science under the hood. Back in the 1980s, Soviet scientists and coaches, Prof. Yuri Verkhoshansky among them, pioneered “anti-glycolytic training” for various endurance events. Where the prevailing approach of dealing with the “burn” of accumulating lactic acid was—and still is—exposing the athlete to ever more intense acid baths, the Soviets had a radical thought: what if we arrange the training in such a manner that the muscles do not produce and accumulate so much acid?

Early efforts concentrated on “putting anaerobic glycolysis in a vice,” as one coach put it, of two other energy systems, alactic and aerobic. The former is responsible for the first twenty seconds or so of a powerful effort before anaerobic glycolysis and the “burn” kick in. Training methods were developed to beef up the alactic “tank” and improve aerobic recovery.

Although these experiments were successful, the above adaptations are fairly limited. It was not until the Soviet Union fell apart that anti-glycolytic training or AGT was revolutionized by Prof. Victor Selouyanov. He discovered how to make the fast and intermediate fibers aerobic.

What gives the slow fibers their endurance are the little organelles called mitochondria. Mitochondria allow one to efficiently produce energy for muscle contractions with the use of oxygen, aerobically. Selouyanov found a way of installing these aerobic machines into fast fibers!

Note: Before we continue, it must be stressed that developing mitochondria in a fast fiber does not make the fiber slower or weaker. Members of the Russian national judo team who have had tremendous success with anti-glycolytic conditioning routinely bench press 1.75-2 times their bodyweight.

Russian national judo team

The Russian national judo team implemented anti-glycolytic training with great success.

Although some recent studies claim to know the answers, the exact cellular mechanisms that turn on mitochondrial growth are not yet known. But Selouyanov figured out the stimuli responsible for turning these mechanisms on. He learned that it is the total time a muscle fiber spends in mild fatigue and acidity that presses the button.

Applying Science to a Simple & Sinister Progression

Runners are familiar with this effect when their slower fibers grow some more mitochondria from training just below the anaerobic threshold. The AnT refers to the exercise intensity when lactic acid accumulation suddenly starts speeding up. Training right below this threshold produces the desired condition of mild local fatigue/acidity.

In fast fibers, the same effect can be achieved by carefully changing the loading parameters in interval training: briefer and more powerful work; longer and active rest. You must stop each set of a high power exercise at the point where the alactic tank is starting to run low but anaerobic glycolysis has not had the time to rev up all to full speed—typically at ten to twenty seconds. Then you must rest longer than what you are accustomed to in order to permit the fatigue and the acid to dissipate. The rest must be active—walking around, jogging, “fast and loose” drills, etc. Easy movement speeds up the elimination of acid.

Prof. Selouyanov sums up mitochondria producing AGT:

…every muscular contraction must be performed with a near-maximal intensity but average intensity of the exercise should not exceed the anaerobic threshold power. In this case all muscle fibers are active in the exercise but, thanks to regulation of the rest pause and the period of muscular relaxation, complete clearance of metabolic products of anaerobic glycolysis must be assured.

This is where the talk test comes in. American research showed that the highest exercise intensity at which you can still talk comfortably places you slightly below the An—if you are not sure whether you are comfortable or not, you are at or slightly above the AnT. (You can also use a heart rate monitor to optimize your Kettlebell Simple & Sinister training intensity instead of the talk test. Al Ciampa, SFG and I tell you how in this blog.)

Now what happens if you rest less, and start your next set while you are still huffing and puffing? Presumably, the mitochondria growing machinery comes to a halt or at least slows down. The endurance you are developing will be more glycolytic in nature and your body composition will be improving through different physiological mechanisms.

Applying the Science to Your Training

There are pros and cons of glycolytic training (I have touched on them briefly in the past and will expand in the future). The most immediate con is the inability to sustain high quality daily training and to have high energy and readiness. Decades ago, the Soviets recognized that predominantly glycolytic training is most stressful to the endocrine system and thus can easily lead to overtraining. Or at least make you feel sore and tired, which is at odds with the stated goals of S&S.

In summary, your Simple & Sinister progression tactic is:

Most of your S&S sessions do not rush the clock and wait until you can pass the talk test before your next set. On the last session of each week push harder and occasionally all out and test yourself.

The post Simple & Sinister Progression Tactic appeared first on StrongFirst.

Understanding the Center of Mass in Kettlebell Training

$
0
0

by Brett Jones, Chief SFG

Mastering the dance of center of mass. Who wouldn’t sign up for a class about that?

With a thick handle and off-set center of mass, the design of the kettlebell is unique and carries with it unique benefits and also some challenges. Traditional dumbbells and barbells tend to center the weight with your hand, but a kettlebell’s center of mass is about six to eight inches from the handle, and that changes depending on what exercise you are performing.

The purpose of this article is to describe this dance between the user and the center of mass of the kettlebell and how it can be used to your advantage and when to understand the challenges presented.

Defining Center of Mass in Kettlebell Training

First let’s begin by defining center of mass:

  • The center of mass is the location where all of the mass of the system could be considered to be located.
  • For a solid body, it is often possible to replace the entire mass of the body with a point mass equal to that of the body’s mass. This point mass is located at the center of mass.
  • For homogenous solid bodies that have a symmetrical shape, the center of mass is at the center of body’s symmetry, its geometrical center.
  • The center of mass is the point about which a solid will freely rotate if it is not constrained.
  • For a solid body, the center of mass is also the balance point. The body could be suspended from its center of mass and it would not rotate, i.e. not be out of balance.
  • The center of mass of a solid body does not have to lie within the body. The center of mass of a hula-hoop is at its center where there is no hoop, just hula.
Center of mass in humans

The changing center of mass in human movement.

So for the kettlebell, the center of mass could be considered to be at the geometric center, but for the human body the center of mass is bit more “active” and changing depending on gravity and our movement.

As you see in the picture above, the center of mass of a person elevates by raising the arms and the center of mass falls outside the body during a toe-touch movement. The dance of center of mass means coordinating the center of mass of the kettlebell and the center of mass of the individual, which is ever changing depending on movement.

Easy, right?

Center of Mass and The Kettlebell Sumo Deadlift

kettlebell deadlift center of mass

The center of mass in the kettlebell deadlift.

In the simplest terms, the kettlebell sumo deadlift allows you to place your center of mass over the kettlebell’s center of mass. A huge advantage when you consider how efficiently this allows you to load this pattern.

Performing a hip hinge, and the posterior weight shift with the trunk angle, means the individual’s center of mass will be changing and then re-centering once the kettlebell is grasped and lifted. This combined center of mass should be centered in the base of support. This should also explain why some deadlifts and swings will look very different depending on body structure and the impact it has on center of mass.

Center of Mass and the Kettlebell Swing

Kettlebell swing

Center of mass shifts during the kettlebell swing.

The kettlebell swing begins to make things interesting. Now the dance becomes a dynamic series of adjustments and balancing/counterbalancing as the force production greatly enhances or challenges this dance. Below is a picture of force plate data from my swing from Brandon Hetzler’s Science of the Swing:

Kettlebell swing force plate chart

Example of a smooth and efficient swing.

Here you can see the float of the kettlebell at the top of the swing, the large eccentric load at the bottom of the downswing, and the force production to once again pop the kettlebell to the float.

At the bottom of the downswing, there are not only the forces of the eccentric hip hinge and weight of the kettlebell pulling my center of mass outside my body into a “face plant,” but also trying to pull me off my feet backward. All of this is balanced out as I drive into the ground to move back from deceleration into force production. Lots going on.

Didn’t realize all of that did you? And while driving to the top for the float, the kettlebell and the center of mass is being projected straight away from me – meaning I have to maintain my center of gravity and not get pulled forward by the kettlebell.

Center of Mass and the Clean and Snatch

We take advantage of this displaced center of mass during the clean and snatch, where the hip action of the swing is used to propel the kettlebell, but the arc of the swing is “tamed” and the centrifugal force and rotation center of mass of the kettlebell are directed to efficiently land the kettlebell at the rack or overhead position. And again on the downswing of both exercises, the arc must be tamed and the rotation and centrifugal force of the kettlebell must be dealt with to efficiently move into the downswing.

All of this means the person swinging, cleaning, or snatching the kettlebell must produce tension and relaxation at the right times, including the grip. During the ballistic drills, the dance of center of mass requires a unique set of skills versus when using a dumbbell.

Center of Mass and the Grinds

Center of mass during press and bottom-up position.

The proper center of mass during the kettlebell press.

Take a moment to look at the pictures above. Note the center of mass of the kettlebell in relation to my right shoulder in the overhead position in the picture on the left versus the center of mass of the kettlebell over my left elbow in the same picture. Then, look at the center of mass of the kettlebell in the bottom-up position in relation to my right forearm and elbow in the other picture. I believe the kettlebells in the leftpicture are 32kg and the kettlebell in the picture on the right is a 24kg.

Notice how the overhead kettlebell center of mass basically lines up over my shoulder, keeping the center of mass of the kettlebell over the center of the joint supporting it. This also means that if the kettlebell is large enough, the arm supporting it may not look vertical but the center of mass of the kettlebell will line up over the shoulder/base of support.

During the press, the movement from the rack position shown on the left arm to the overhead position means you will move through the vertical position shown in the bottom-up picture. With kettlebells upwards of 32kg for men and 16-20kg for most women, the off-set center of mass will guide the path of the press and be advantageous for the mechanics of the press. Beyond 40kg and 20kg, the ability to hit a vertical forearm is challenged and individuals can end up pressing from a slightly internally rotated shoulder position. A volume of pressing from this position could cause some irritation at the shoulder.

During the get-up, the individual “moves around” this center of mass through the different positions and transitions. Again, if the kettlebell is large enough, there may not be a vertical arm at certain stages of the get-up, but the center of mass of the kettlebell will line up with the base of support. Otherwise, the off-set center of mass can produce a negative stress on the shoulder.

The Dance of the Center of Mass

Also keep in mind that the larger the kettlebell and the more displaced the center of mass, the more it will impact the stability to keep the alignment of the center of mass with the supporting structures. Limb length also plays a role. Longer limbs mean more displacement of center of mass and shorter limbs can mean more of a mechanical advantage. Read  more on this in Brandon Hetzler’s article A Long Way to Press.

So, there you have it. A quick rundown of the dance of center of mass in kettlebell training. This dance means kettlebell training is more “alive” than some other forms of resistance training and can be a benefit or a challenge depending on the exercise.

Brett Jones StrongFirstBrett Jones is a Certified Athletic Trainer and Strength and Conditioning Specialist based in Pittsburgh, PA. Mr. Jones holds a Bachelor of Science in Sports Medicine from High Point University, a Master of Science in Rehabilitative Sciences from Clarion University of Pennsylvania, and is a Certified Strength & Conditioning Specialist (CSCS) from the National Strength and Conditioning Association (NSCA).

With over twenty years of experience, Brett has been sought out to consult with professional teams and athletes, as well as present throughout the United States and internationally.

As an athletic trainer who has transitioned into the fitness industry, Brett has taught kettlebell techniques and principles since 2003. He has taught for Functional Movement Systems (FMS) since 2006, and has created multiple DVDs and manuals with world-renowned physical therapist Gray Cook, including the widely-praised “Secrets of…” series.

Brett continues to evolve his approach to training and teaching, and is passionate about improving the quality of education for the fitness industry. He is available for consultations and distance coaching by e-mailing him at appliedstrength@gmail.com. Follow him on Twitter at @BrettEJones.

The post Understanding the Center of Mass in Kettlebell Training appeared first on StrongFirst.

Simple & Sinister + Heart Rate Training

$
0
0

By Al Ciampa, SFG and Pavel Tsatsouline, Chairman

In the Simple & Sinister Progression Tactics blog, you learned how to accelerate your Kettlebell Simple & Sinister progress by optimizing your training intensity with the talk test. But there is another, more accurate way to monitor your rest periods besides the talk test: heart rate (HR) training.

Your HR, or pulse, is a rough indication of your current level of stress, including the work that you are performing. If you “work to an HR,” you will provide a metric to the conditions that you can compare over time.

heart rate training with the kettlebell

Heart rate training can take Simple & Sinister to a new level.

Heart Rate Training as Applied to Simple & Sinister

First, you must find your target heart rate. There are many ways to do this, but the easiest and likely the most applicable to the population is “180-your age” by Dr. Phil Maffetone. In this case (swing intervals), you may add 5 BPM to your “180-age” result to get your target. Whatever your target HR, you must not exceed this during your session.

So, 180 – your age + 5 = target HR.

Next, you will notice that when you perform your swings, your HR will spike somewhere between 5-15 seconds after you complete your set, and may or may not linger around this value. This is the task: ensure that these spikes do not exceed your target HR.

This takes some practice. So, do a set of swings and observe the monitor. Do another set of swings, and again, observe the reading on the monitor. In a bit of time, you will get the feeling for what your starting HR must be – “the HR observed on the device before a set” – to ensure your HR does not exceed your target during the spike after the set. A few preparatory sessions will suffice for discovering the dynamics of your heart’s response to exercise.

The initial work sets of your session will require some time to elevate your HR. The heart’s rate lacks in response to work, initially. Do not interpret this as a free ride to do more swings until your HR spikes. You will regret it. Rest appropriately between sets for the initial few minutes of the session. Again, your own practice will teach you more than we can. As a personal experiment, take your swing session out to 20-30 minutes one day, in sets of 10, using the above instructions, and observe how your HR dynamics change.

The Importance of Tension in Heart Rate Training

There are many external factors that can affect your HR values: heat, humidity, hydration level, medications, illness, stress level, sleep, etc. However, the most important one within your control is the tension you use during your swings—its magnitude and timing.

High tension will spike the HR, but total tension at the lockout is non-negotiable—this is hardstyle. But this tension does not need to be maintained throughout the set, except in heavy double swings that are no longer ballistic; they are what Jeff O’Connor called “fast grinds.”

One can find moments of relative rest during the float and the backswing, which will lower the HR without compromising the swing’s power. After the kime, power your plank down. Keep just enough tension to maintain your structure and protect your spine. Just like a fighter who maintains a moderate brace between strikes, just in case, but maximizes it only on impact.

Cranking tension up and down in a blink of an eye is not an easy skill to acquire. Be patient. It might turn out that to keep your heart rate from exceeding the “180 minus age” ceiling after a set of 10 swings, you are forced to use a very light kettlebell.

If this is the case, use a favorite StrongFirst tactic of cutting the reps and upping the sets: instead of 10×10, do 20 sets of 5 reps. Peter Park, a strength and conditioning coach who has most of the elite he trains do Simple & Sinister-type swing sessions, comments:

In the swings I would expect their heart rates to stay below max aerobic even when doing 10 hard swings (some will be able to do more). In the beginning of the base building 5-ish is what most people can do. My goal is to get 10 hard swings on the min while staying aerobic. I put a HR monitor on and keep track. Not only do I like to see the max aerobic ceiling, but as the athletes get deeper into the base training, their heart rates drop incredibly fast, often to 90 or 80 at the end of the minute. I can often gauge when an athlete is ready for a break from racing or speed training when this swing test and other max aerobic tests start to decline.

You will have an easier time keeping your session aerobic while using a heavier weight. This format will subtly change the benefits—more power gains, a little less muscle hypertrophy, and a greater ability to quickly relax your muscles after contractions. When ready, move up to 14 sets of 7 reps (98 total), and eventually 10×10.

The Progression

Once you have spent a number of sessions locking down your technique, tension level, and starting HR, you will likely notice you are able to do more work under the same HR as time goes on. This is improvement.

Russian sports science differentiates training loads between “external” and “internal.” The former refers to doing so many reps, with so much weight, with this much power, this little rest, etc. The latter reflects the internal cost of the external load. In the type of training discussed in this blog, the HR reflects the internal load. If you can get through your 100 reps in less time without compromising the swing quality and at the same heart rate, then you have gotten in a better shape.

Some folks begin to see improvements right away; others will require more time. It is unlikely you will progress all the way to the “sinister” goal by following your HR in training. Occasionally, you will need to compress your rest periods and go glycolytic.

The post Simple & Sinister + Heart Rate Training appeared first on StrongFirst.

Viewing all 80 articles
Browse latest View live